Apple Pie Bars With Crumb Topping {+VIDEO}
This post may contain Amazon or other affiliate links. As an Amazon associate, I earn from qualifying purchases.
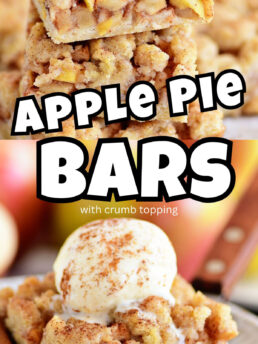
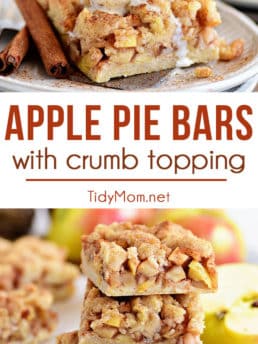
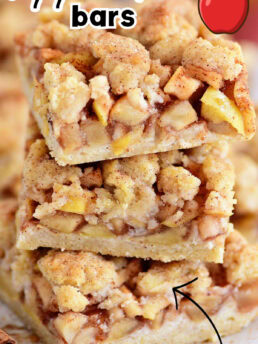
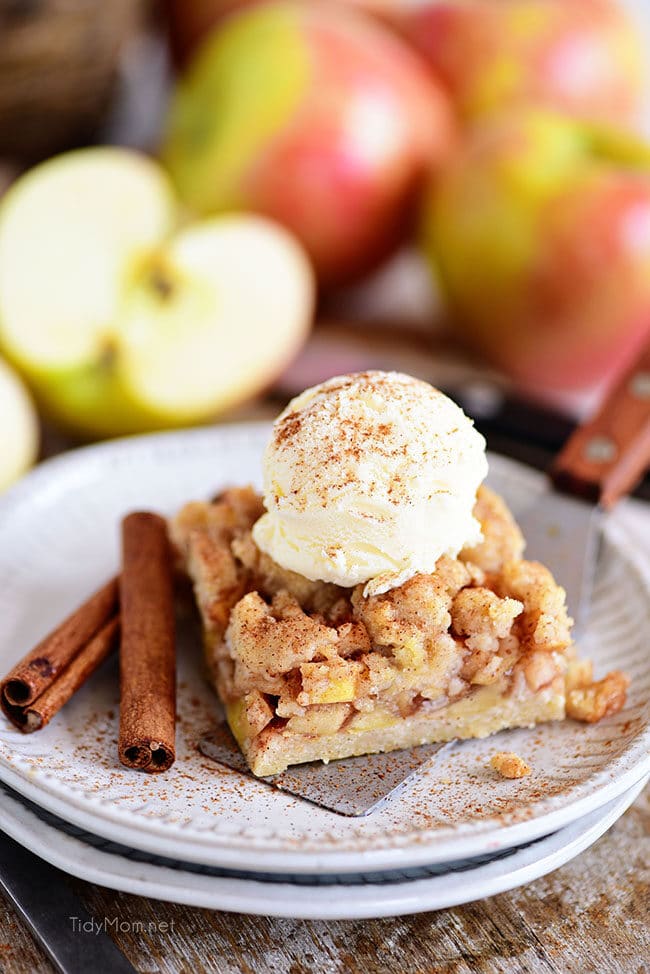
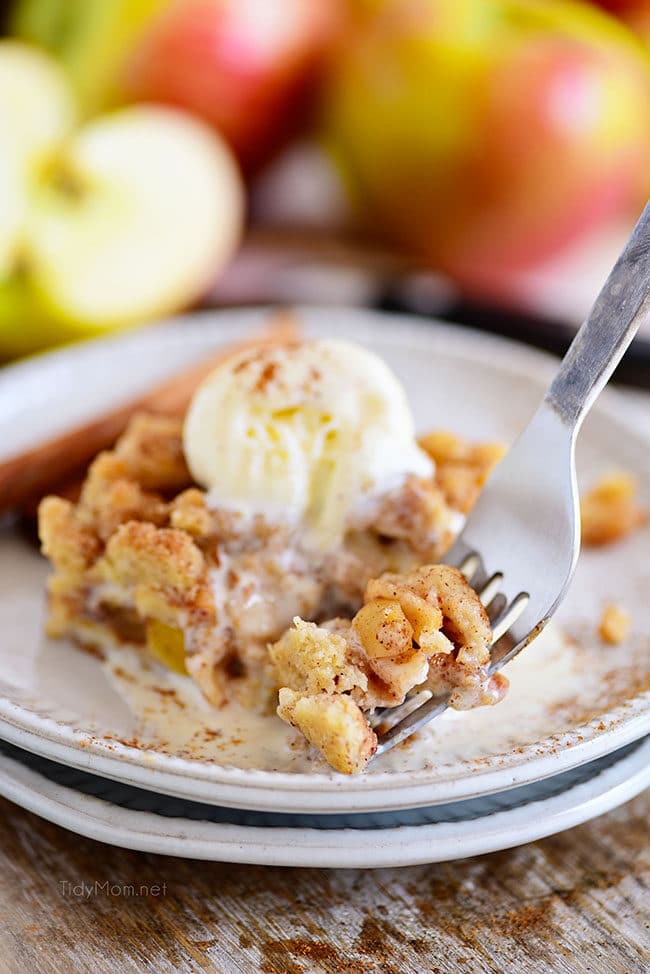
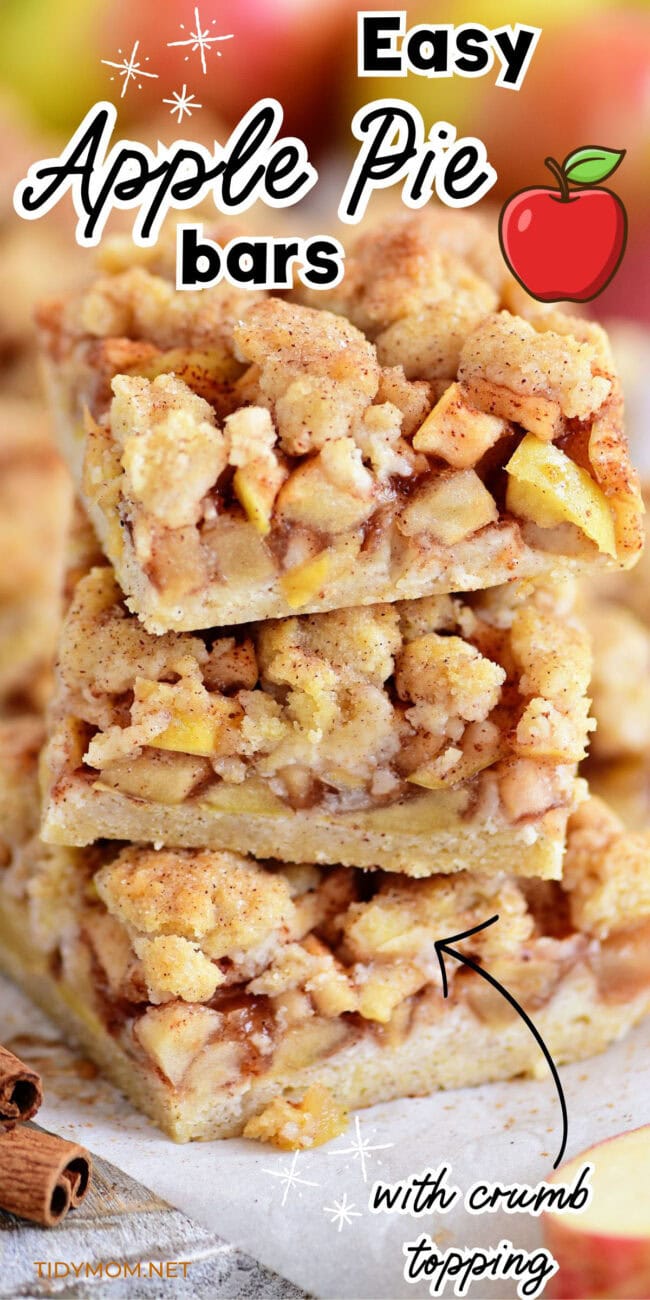
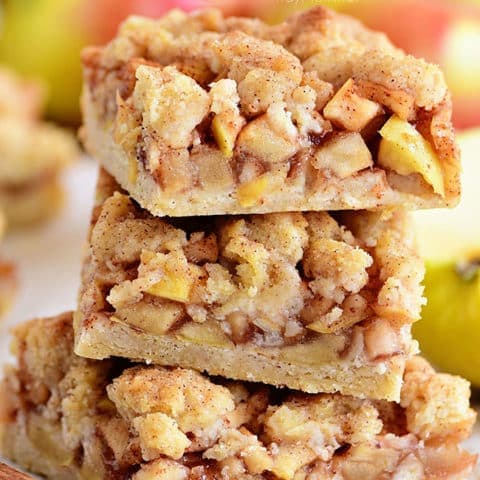
Apple Pie Bars are easier than apple pie and just as delicious. Made with fresh apples and a buttery crumb topping, they are sturdy enough to eat with your hands. But there’s nothing better than warm pie with a scoop of vanilla ice cream. Am I right?
Apple recipes like Apple Pie Crepes, Upside-Down Apple Pecan Pie, Easy Apple Cake, and Dutch Apple Pie Milkshake are fan favorites. Get the vanilla ice cream ready—this one’s sure to be a hit!
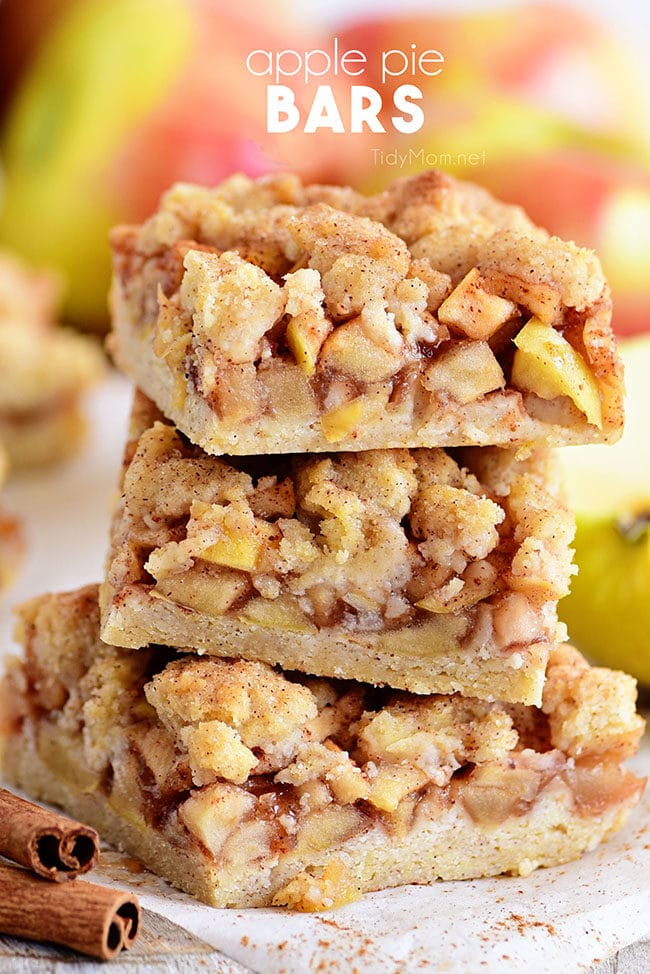
Table of Contents
Apple Pie Bars With Crumb Topping
It’s officially Fall!! and what is fall without apple pie?? I can’t remember the last time I made it through a fall season without making at least a handful of apple pies. The only problem is they can be a bit of a pain to make. They are always worth it, but I always wish I had an easier recipe.
Well, my dreams have come true because low and behold, I found the perfect solution to getting that classic apple pie flavor, with half of the hassle, and it’s these apple pie bars with a crumb topping! The flavors in this rival that of even the best apple pies I’ve had.
Fresh chopped apples, homemade crumb topping, and a dash of cinnamon will have you running to the kitchen, fork in hand! Seriously don’t let another day go by without having a batch of dessert bars in your life.
How To Make Apple Pie Bars With Crumb Topping
When you are making this recipe, you’ll want to use the full recipe at the bottom of the page.
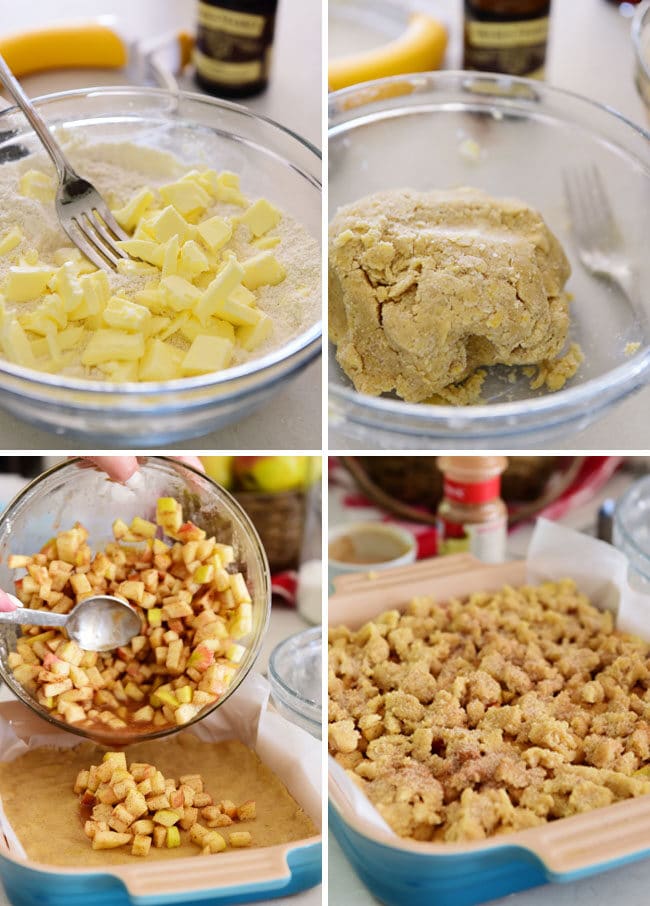
- Preheat your oven and place diced apples in a large mixing bowl then add a little lemon juice and vanilla and toss to coat. In a separate bowl, you’ll whisk together sugar, cornstarch, and apple pie spice. Pour the dry mixture over apples and toss until evenly coated and set aside.
- Next, in a medium bowl whisk flour, sugar, baking powder, and salt, then add cold cubed butter and, cut the mixture together until it resembles coarse crumbs. In a small mixing bowl, whisk together the egg and vanilla bean paste until combined, and add the egg mixture to the coarse crumb mixture and mix to bring the dough together.
- Once the dough mixture is prepped, press half of it into the prepared baking dish and pour your apple filling over the dough. To finish off the prepping, just crumble the remaining dough over the apple layer, and sprinkle over the crumb topping. Bake in the preheated oven until the top is a light golden brown.
TIP: You can test your baking powder for freshness. Simply, pour a little baking powder into hot water — if it fizzes, it’s still good to use!
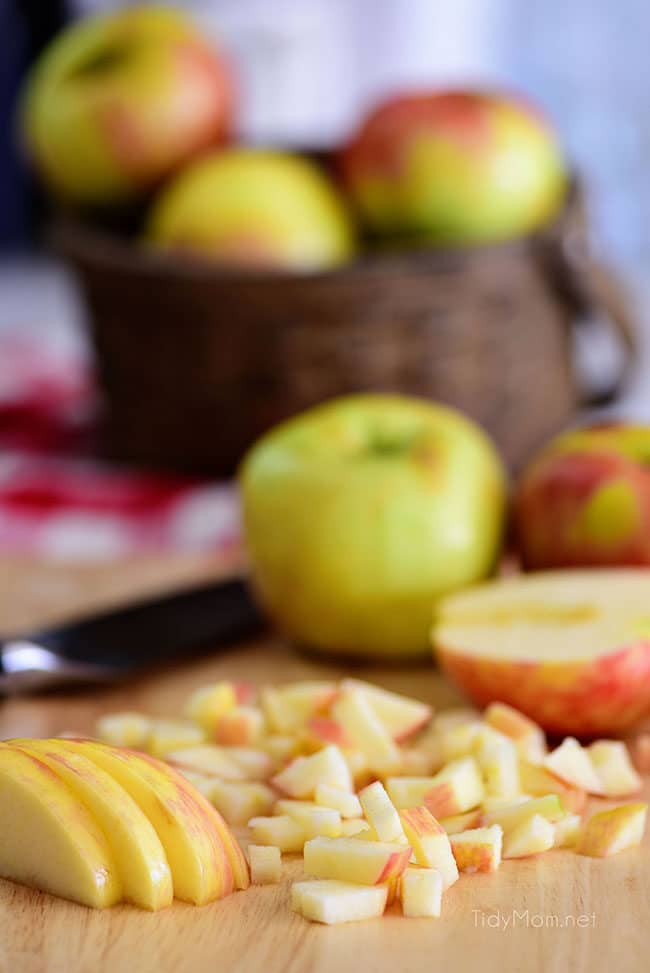
What Kind Of Apples Can You Use For These Apple Crumble Bars?
It can get confusing when it comes to picking apples for a recipe, because of just how many apple types there are. You might find yourself scratching your head wondering which are better for snacking, and which are better for baking.
The rule of thumb when baking with apples is to choose one that’s not overly sweet on its own and will hold up and not get mushy when baked. So here are your best options when it comes to this apple pie bar recipe:
- Honey crisp (what I used for this recipe)
- Granny Smith (for a tart forward flavor)
- Gala
- Pink lady
- Braeburn
Recipe Tips For Success
- Use Fresh apples: For this recipe, you can not use apple pie filling. It’s just not going to give you the same result, so only use fresh apples.
- Do NOT use softened or room temperature butter. The cold temp of the butter is very important to make the crumb topping correctly.
- Don’t use old baking powder. It goes bad faster than you would think, and won’t be as effective in the recipe if it’s old and expired.
- Don’t overwork the crumb topping. This also will make the butter melt too soon.
- For super easy and mess-free removal of the bars from the dish, place a layer of parchment paper in the bottom of your baking dish and let the paper hang over the sides.
- These will disappear fast, so if you’re serving more than just a few people, double the recipe and bake in a 9×13 baking dish.

Do These Apple Pie Bars Really Taste Like Apple Pie?
Yes! As someone who is a BIG fan of apple pie, I’m always skeptical of any dish that claims to be an easier dupe of one of my favorite desserts. When I first tried this recipe I proceeded with caution, not to get my hopes up too much, but it honestly blew my expectations out of the water.
These apple pie bars have all the flavors you love in an apple pie and are twice as easy to make. Almost too easy to make, I might end up with a new batch in the house every week of fall this year.
Why We Love This Apple Pie Bars Recipe
- Flavor Explosion: Fresh chopped apples, a dash of cinnamon, and a buttery crumb topping make these bars totally irresistible.
- Easy as Pie (but Better): All the deliciousness of apple pie without the fuss—because who has time for that?
- Crispy, Crunchy, YUM: That homemade crumb topping adds the perfect texture and sweetness in every bite.
- Handheld Happiness: No forks needed! These bars are sturdy enough to grab and go, making them perfect for busy days.
- Ice Cream’s BFF: Warm up a bar, add a scoop of vanilla ice cream, and boom—dessert perfection!
Can I Make Apple Pie Bars Ahead of Time?
Of course! While you can’t plan to make this dessert a week before you want to serve it, you can definitely make it the night before, and it will last in the refrigerator for up to three to four days.
Naturally, everything will taste the best when served the day of, but if you really need to push something off to the night before, this recipe will still be amazingly good the next day.
Just be sure to store the bars in an airtight container, or over the baking dish in plastic wrap before placing it in the refrigerator.
Room Temperature: Keep them in an airtight container at room temperature for up to 2 days.
Refrigerator: Store them in an airtight container in the fridge for up to 5 days. They taste great chilled!
Freezer: Freeze the bars in a single layer, then transfer to a freezer-safe container or bag. They’ll keep well for up to 3 months. Just thaw them at room temperature when you’re ready to enjoy.
Tools used to make these apple pie bars with crumb topping:
This is also known a dough cutter, and it’s a must-have for any recipe that calls for a crumb topping. It’s what allows you to get that perfect texture with ease.
I don’t always like to splurge on bakeware, but le cruset is always worth it. It helps get a perfect bake every time.
Like This Recipe?
I’d love to hear what you think! Leave a review below and let me know how you liked the recipe!
Apple Pie Bars With Crumb Topping
Apple Pie Bars are easier than apple pie and just as delicious. Made with fresh apples and a buttery crumb topping, they are sturdy enough to eat with your hands. But there’s nothing better than warm apple pie paired with a scoop of vanilla ice cream on top.
Ingredients
FOR APPLE FILLING
- 2 cups (about 3 medium-size apples) chopped Honeycrisp Apples
- 1/4 cup granulated sugar
- 2 tablespoons cornstarch
- 1 teaspoon apple pie spice
- 1 teaspoon vanilla extract
- 1 teaspoon lemon juice
FOR CRUST AND CRUMB TOPPING
- 1 1/2 cups all-purpose flour
- 1/2 cup sugar
- 1/2 teaspoon baking powder
- 1/4 teaspoon salt
- 1/2 cup butter, chilled and cubed
- 1/2 teaspoon vanilla bean paste
- 1 egg
CINNAMON & SUGAR TOPPING
- 1 tablespoon granulated sugar
- 1/4 teaspoon cinnamon
Instructions
- Preheat oven to 350° F. Lightly grease an 8x8 inch baking dish (also line with parchment and grease if you'd like to lift bars out easier). Set dish aside.
- Place diced apples in a large mixing bowl. Add lemon juice and vanilla and toss to coat. In a separate bowl, whisk together sugar, cornstarch, and apple pie spice. Pour dry mixture over apples and toss until evenly coated. Set aside.
- In a medium bowl whisk flour, sugar, baking powder, and salt. Add cold cubed butter and using a fork or a pastry cutter, cut mixture together until it resembles coarse crumbs. In a small mixing bowl, whisk together egg and vanilla bean paste until combined. Add the egg mixture to coarse crumb mixture and mix (you may want to use your hands) to bring the dough together.
- Press 1/2 of the dough mixture evenly into prepared baking dish.
- Pour apple filling over the dough, and crumble the remaining dough over the apple layer. Combine cinnamon and sugar in a small bowl and sprinkle over crumb topping.
- Bake in preheated oven for 40-42 minutes or until the top is a light golden brown.
- Cool completely before cutting into squares.
- This recipe can easily be doubled and baked in a 9 x 13-inch pan. Baking times remain the same.
Notes
STORAGE:
Room Temperature: Keep them in an airtight container at room temperature for up to 2 days.
Refrigerator: Store them in an airtight container in the fridge for up to 5 days. They taste great chilled!
Freezer: Freeze the bars in a single layer, then transfer to a freezer-safe container or bag. They’ll keep well for up to 3 months. Just thaw them at room temperature when you’re ready to enjoy.
Nutrition Information:
Yield: 9 Serving Size: 1Amount Per Serving: Calories: 276Total Fat: 11gSaturated Fat: 7gTrans Fat: 0gUnsaturated Fat: 4gCholesterol: 48mgSodium: 177mgCarbohydrates: 42gFiber: 2gSugar: 22gProtein: 3g
Nutrition information is estimated based on the ingredients and cooking instructions as described in each recipe and is intended to be used for informational purposes only. Please note that nutrition details may vary based on methods of preparation, origin, and freshness of ingredients used.

Hi there, I'm Cheryl!
As a wife, mom, and caffeine enthusiast, my journey has taken me from bustling mornings with my family to sharing delicious recipes, home care tips, and heartfelt decorating insights with wonderful readers like you. My love for baking, photography, and tidiness shines through every post I craft. Dive into my world and discover the art of homemaking, one tidy moment at a time. Read more...
Tidymom is a participant in the amazon services llc associates program, an affiliate advertising program designed to provide a means for sites to earn advertising fees by advertising and linking to Amazon.com.
Please respect my work, recipes and photographs. If you do use a recipe in your own writing, please give proper credit and link back to the original post.
Everyone at my house loved it!! It was really delish!
Thanks for this amazing recipe.
Oh my goodness, these look DIVINE. Saving the recipe!
Looking yummy!
Hi Cheryl — I can hardly wait to try your Apple Pie Bars recipe. One question, can you substitute vanilla extract for vanilla bean paste? I make my own vanilla extract too and after reading all the yummy ingredients which go into your recipe, I’m going to double it even though its just my hubby and I. I know he is going to love your recipe! — Thanks, Jan
Hi Jan!! yes you can use extract or paste! I love to use vanilla paste when I want the flecks to “shine through” like in a frosting or ice cream, and you can certainly use it in this recipe as well.
Can you make this ahead of time and store in the fridge until baking? Will that affect the crumble? Thank you!
I’m not sure, I have not tried that. Keep us posted if you try it!
Cheryl these look wonderful. It’s hard to believe it’s Apple picking time. I haven’t checked but guessing it will be minimal picking at best. Fall is certainly here. My favorite time of year. I’ll be sure to try these.
Hope you and your family are safe and well. Take care.
Definitely trying these – they look like the perfect fall treat!
Lauren,
This recipe is a NEW FAVORITE! It has completely replaced apple pie at my house! 😀