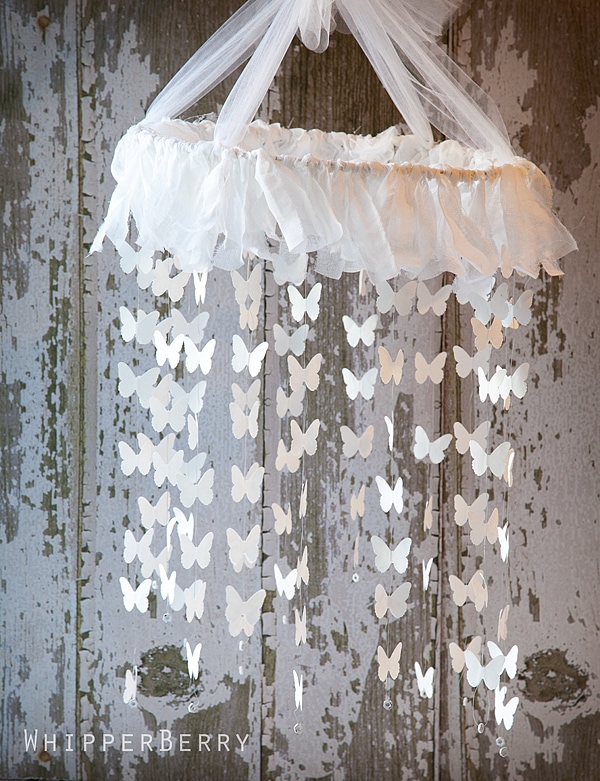
DIY Butterfly Mobile | {Guest Post}
This post may contain Amazon or other affiliate links. As an Amazon associate, I earn from qualifying purchases.
I’m so excited to share today’s guest with you all!! You are about to meet one of the most creative girls in blogland! Heather knows how to take ordinary and make it extraordinary. I knew I’d love her from the first moment I found her blog, and I was even more thrilled when I got to meet her in person this year at EVO. I’m honored and thrilled that she said she’d whip up a special guest post just for my readers!……..and in Whipperberry style, Heather has something fantastic to share with you today……you’re gonna love her!
Giddy would not even come close to describe how excited I am to be guest blogging here on Tidy Mom today! But I am getting ahead of myself… Hello TidyMom Fans, this is Heather from WhipperBerry.
WhipperBerry is a Creative Lifestyle blog that I created a little over a year ago to document all of my crazy creative whims. I love photography, crafting and cooking. Combined they make for some pretty fun blogging. Not only does this allow me to really get to know my creative side, it blesses me the opportunity to meet some amazing people like Cheryl! When sweet Cheryl asked if I wanted to guest post I was truly honored and I knew I needed to come up with something fantastic. Here is what I have to offer, I hope it fits the bill…
DIY Freezer Paper & Crinoline Butterfly Mobile
I am currently in love with a number of things, a few of which are… the color white, butterflies, freezer paper and crinoline. What is crinoline you ask? It’s a fabric that has been used for many years under skirts and dresses to give a fuller effect. I have started using it for a couple of projects and have fallen in love with the crisp, white, rustic effect that it can add to a project. It cuts and tears beautifully and is a dream to work with. Enough about that… here is what you will need to make a butterfly mobile of your own.
- Metal hoop
- White spray paint
- Fishing line
- 10-15 small nuts from the hardware store
- Freezer paper
- Large butterfly paper punch
- 1 yard of crinoline
- 8 yards of 6 inch wide tulle
To begin, I needed to spray paint my metal hoop and my hardware nuts white.

Once that was done, I started on punching all of the butterflies out of the freezer paper with my Martha Stewart All Over Classic Butterfly Punch. I punched and punched because I wanted to make sure I had enough and I wasn’t quite sure how many I would need. Ultimately I used 196 butterflies… so get busy!

The next step is to cut some fishing line roughly about 40 inches. Feed the nut into the cut fishing line and center. Fold the fishing line in half and then place the two butterflies back to back {the back being the shiny side of the freezer paper} and then carefully with a warm iron, iron the butterflies together starting at the base of the folded line, right above the nut. This is the MAGIC of freezer paper. When heat is applied it creates a fabulous seal with the fishing line securely in the middle of the butterfly. Continue adding six more butterflies up the line leaving roughly a three inch space between each butterfly.
I placed a total of seven butterflies {that would be 14 single butterflies} on each line. I used 14 separate strands for the large hoop that I used. You many need more or less depending on the size hoop that you use. Set aside and grab your crinoline.
Instead of cutting my crinoline, I wanted it to have a rustic effect so I opted to tear the fabric rather than cutting it with scissors. To start the tear, I would make a little snip on the edge of the fabric about and inch in from the edge and then tear straight down the fabric. Repeat the process until you have created several one inch strips from the entire yard of fabric. Now, you will take your scissors and cut the strips into smaller strips about seven inches long. Tie them onto the ring in intervals of six. After the sixth fabric strip then tie the butterfly line onto the hoop. Tie securely and then clean up the ends at the top of the fishing line to create a clean effect.

Once you finish tying on all of the butterflies and the crinoline all you have to do is to cut four strips of white tulle roughly about about 2 yards. Fold the tulle in half and then tie on the hoop at 12 o’clock, 3 o’clock, 6 o’clock and 9 o’clock. Bring the tulle up to the top and balance the mobile and then tie the tulle in a bow. Trim the ends to your liking and voila… you are finished!!
This mobile is perfect for so many types of rooms. A nursery, a fun girls room of any age or even a fun accent to a shabby chic type living space. I have actually made it for a fun room makeover for my friend Sarah’s workout room. Sarah was on last season of The Biggest Loser and she wanted the butterflies to symbolize her transformation she is the middle of. Here are some of the other projects that we have created for the room makeover…
weathered wood sign and a great mirror!

I can’t wait to show off the final project in a few weeks. You’ll have to stop by WhipperBerry and become a follower so you can see the final project!
Cheryl, thank you so much for letting me stop by today. You’ve been a lovely hostess!
Tidymom is a participant in the amazon services llc associates program, an affiliate advertising program designed to provide a means for sites to earn advertising fees by advertising and linking to Amazon.com.
Please respect my work, recipes and photographs. If you do use a recipe in your own writing, please give proper credit and link back to the original post.


Incredible! I am very impressed. This is truly a wow piece!
Gorgeous!! Fabulous guest post. 🙂
Oh my oh my…. this is simply the most gorgeous and simple mobile, ever! I am amazed at peoples creativity. Beautiful!
very cool! Great guest post
so very cute!
Gosh, that is *really* pretty! I love it!
So lovely.
Gorgeous! I loved it. Gotta love that freezer paper! Thanks so much for sharing!
Amazing!!! What a fun mobile. I need to make one for our baby:)
Ooooh, two of my favorite people in one place! I love that butterfly mobile. Heather is super super talented!!
xoxox
Jen
LOVE this guest post and I so enjoy meeting amazing new bloggers. Might have met miss Whipperberry for half a second at evo. Must dash to her blog now & will keep up to date with her creativity. Thanks for a great post ladies – love the mobile!
Love this post. Its so pretty and so creative!
So delicate and feminine, really gorgeous work.
This is so beautiful. How long do you think it took you to make it? I wish I had seen this earlier. My cousin just had a butterfly festival in honor of her daughter who was murdered – in the wrong place at the wrong time! She would have loved this. I’ll have to forward her the link. So beautiful. I had no idea Martha had such fun punch-outs.
Absolutely gorgeous, Heather…but I wouldn’t have expected anything else…
Oh my word! Heather is one of the most fantastic people. Both creatively, and in real life. I adore her! This is completely lovely. And I love that it’s all white. Maybe crinoline and I need to get to know each other. 🙂
Absolutely gorgeous and such a beautiful idea.
Thank you all so much for all of your sweet kind words! Here are some answers to your questions…
This actually really didn’t take too much time. I would have to say 3-4 hours at the most. I would spray paint the ring and the nuts the day before and let the paint have time to dry completely.
Crinoline, Crinoline… I’m telling sweet Miss Ellie G, Crinoline is the new burlap. Just sayin’
Seriously Heather, you are my hero! Everything you do is just beautiful!
Wow, this is so stunning!
I adore this. I want one for my art studio!
I assume the nuts were used on the bottom for weight. Novel idea.
I was also a little unclear about where the nuts go.. can anyone clear that up?
from the post: “cut some fishing line roughly about 40 inches. Feed the nut into the cut fishing line and center. Fold the fishing line in half and then place the two butterflies back to back {the back being the shiny side of the freezer paper} and then carefully with a warm iron, iron the butterflies together starting at the base of the folded line, right above the nut. ”
if you look at the finished mobile, you can see each line of butterflies has a nut at the end. —- when you fold the fishing line in half with the nut on it – the nut will then be at the bottom, then you place the butterflies above the nut. HTH
I luv this idea. Thank you for sharing.
I love this mobile my granddaughter and I are making butterflies for a mobile for her room. What kind of hoop are you using and where did you get it. It is a beautiful mobile. thanks
Gail