Fabric Covered Switch-plate Tutorial
This post may contain Amazon or other affiliate links. As an Amazon associate, I earn from qualifying purchases.
You may remember last week I showed you how I made some easy fabric covered wall artfor my bathroom.
After I hung them, I decided to make a fabric covered switch-plate match!


How to make a fabric covered switch plate
It’s super easy, but I took a few pictures along the way to show you!
Fabric Covered Switch plate
Supplies:
- Switch plate cover
- Small piece of fabric
- Plastic or something to cover your work surface
- Mod Podge
- Sponge brush for Mod Podge
- X-acto knife
- Scissors
// ]]>
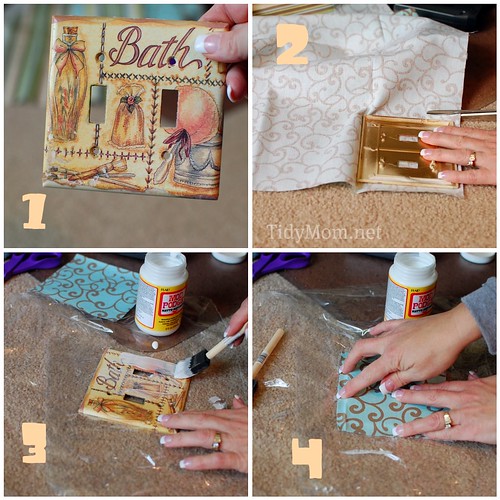
1. Start with your average outdated switch plate cover.
2. Cut fabric just a little bigger than your switch plate.
3. Cover the switch plate with Mod Podge.
4. Lay your piece of fabric on top of the Mod Podge, and press down all surfaces. Be sure to smooth out any creases or bubbles.
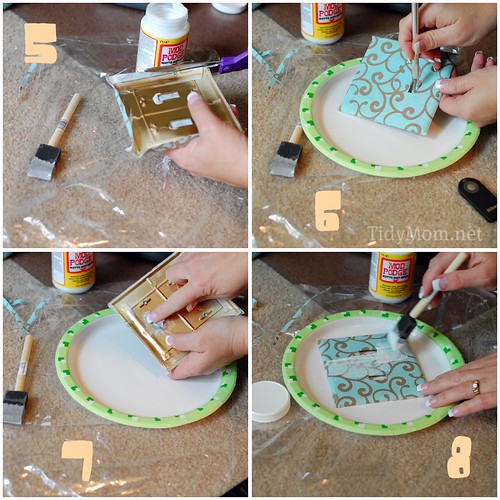
6. Use an X-acto knife to cut out the slots where your switch thingies will go(I left one side attached- see next step)! – you can also use the X-acto knife to punch a whole where the screw holes are.
7. Flip switchplate over and use a little Mod Podge to glue down the pieces you cut for the opening.
8. Turn the switchplate back over and cover with 2 coats of Mod Podge.
Hang your beautiful new switchplate!


// ]]>

Hi there, I'm Cheryl!
As a wife, mom, and caffeine enthusiast, my journey has taken me from bustling mornings with my family to sharing delicious recipes, home care tips, and heartfelt decorating insights with wonderful readers like you. My love for baking, photography, and tidiness shines through every post I craft. Dive into my world and discover the art of homemaking, one tidy moment at a time. Read more...
Tidymom is a participant in the amazon services llc associates program, an affiliate advertising program designed to provide a means for sites to earn advertising fees by advertising and linking to Amazon.com.
Please respect my work, recipes and photographs. If you do use a recipe in your own writing, please give proper credit and link back to the original post.
I love this! The switch plates in my kitchen are so ugly and we were going to buy new ones, but now I’ll just cover them in fabric! Also, I absolutely love your wall paint color? We’ve probably spent $50 on paint samples in the last week trying to find the perfect tan! What color did you use??
It’s linen white from Olde Century Colors http://www.oldecenturycolors.com/ecommerce/products.cfm?cat=20
I love their paint and I have that color in most of my house!
Do you think this would work with a burlap? Or would it.be too rough/texturized?
Thanks!
Bre
Found you on Pinterest! I did this yesterday for two plates and today I am doing it for 4 rooms! I love it!
What a gerat job! Saw these on Pinterest and just had to say ‘hello!’ I am going to give these a try!
Love this idea…was wondering where you got the turquois and brown material…it would look great in my living room. Thanks!!
what a great idea…hats off to you for being so thrifty !!!!!!!!
If I ever wanted to remove the fabric, how would I go about it…would it require purchasing a new cover?
I’ve wanted to do something with our switch plates… this is SUCH a great idea!
What a great idea!! Love this – I’m going to do this for my daughters’ rooms!
Tidymom, thank you so much for shareing this with us. The plates is just awesome! I’m retired and I’m looking for some thing to do and maybe sale. What do you think!
Tidymom, thank you so much for shareing this with us. The plates is just awesome! I’m retired and I’m looking for some thing to do and maybe sale. What do you think! PS, Do you cover the back also?
I have been doing this with my switchplates in my kitchen using craft book paper. I have been using rubber cement to glue the paper on and then spraying with lacquer so they are washable and can be cleaned. However I am having trouble getting thank you paper to stick to the sides of the switchplate. Do you have any suggestions on how to get the paper to stick to the sides?