This post may contain Amazon or other affiliate links. As an Amazon associate, I earn from qualifying purchases.
Boy do I have a treat for you today! The craftalicious girls over at eighteen25 are here show us how to make a Survial Kit. I can only imagine all fun I could have making these for my self and for all my girl friends!! Just think, bridesmaid gifts, Mother’s Day, birthday, Christmas! So cute!
Take it away ladies……………………
Hi there TidyMom friends!!
we are Jennifer, Jamie and Jodie, the sisters from eighteen25 .
We are big fans of Cheryl’s and the TidyMom blog so we are very excited to be here today!!
We don’t know about you but there are lots of days when we feel like we live in the car.
from morning till dinner time….it’s go, go, go.
If you can relate, go grab yourself a potholder.
you need one of these babies!
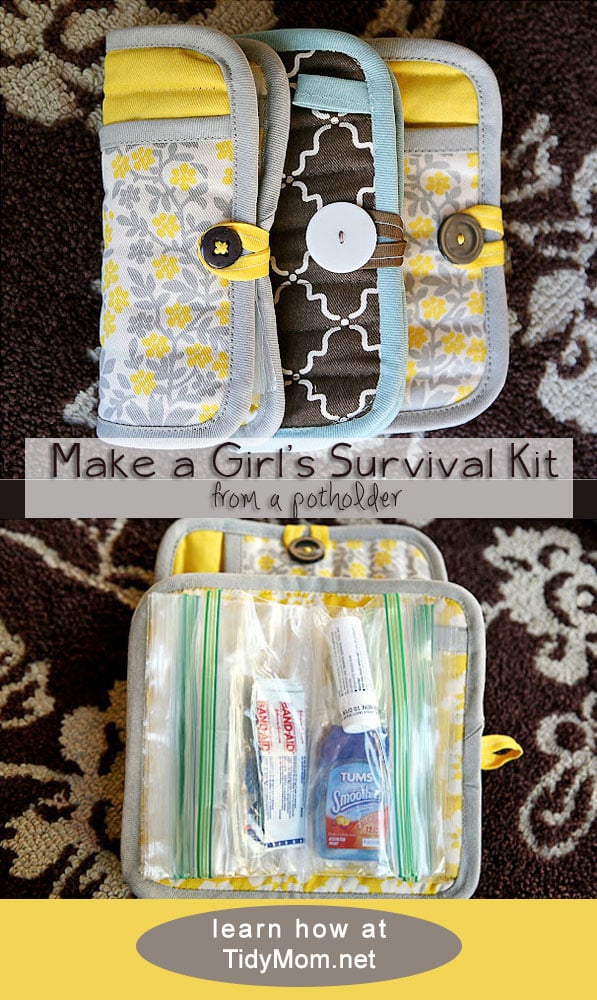
it’s a girl’s emergency clutch!
(cute potholder turned emergency wallet)
Survival Kit
you know…a catch all!
for the things you always need….but never have.
It’s perfect for your car or purse or boat or camper…..
so, let’s get started!
here’s what you’re going to need:
(just a few things really)
1. a square potholder (ours are from Target…the Dwell line)
2. a large button
3. about. 6″ grosgrain coordinating ribbon
4. 10 snack size zip lock baggies
5. tape
6. coordinating embroidery floss
7. sewing machine
step 1: lay your potholder inside up (make sure your pocket is at the top, either on the inside of the wallet or the outside). place one zip lock on the right side (zipper toward the right edge) and place a piece of tape on the top and bottom (to keep the baggies from moving). place another zip lock on the left side overlapping the first (with the zipper toward the left edge) and tape the top and bottom. continue alternating sides and overlapping the bottoms of all ten baggies (5 on each side).
step 2: now that the baggies are securely taped in place, sew a zig zag stitch all the way down the middle of the potholder (which should also be down the middle of the overlapped baggies).
step 3: fold your potholder in half to make your wallet and find your middle to sew on your button. we used yellow embroidery floss…just to make a statement.
step 4: using your 6″ piece of grosgrain ribbon, fold in half lengthwise and sew all the way down. (you can use a thinner ribbon or even a hair elastic…this is just what we had on hand). then, on the backside of your wallet, make a loop with your ribbon large enough to fit over your button and sew down.
and…there you have it!
(back)
(front)
a few ideas of things to put in your emergency clutch:
advil or tylenol
tums
band aids/first aid cream
gum/mints
tooth picks/floss
hair elastics
eye drops
cough drops
emergency medication
matches
feminine products
an emergency mimi (pacifier)
cash
spare house key
nail file
tweezers
pen and pencil (for that cute front pocket, of course!)
Thanks so much for having us Cheryl!!
About the Author:
born + raised in vegas. These three sisters grew up in a little brick house on the east side of town. The number hammered onto their mailbox was 1825.
Visit eighteen25 for three fun, crafty sisters who love to create, share fun tutorials and free printables.
Craving more? Sign up for the TidyMom newsletter to stay on top of what’s new right to your inbox! And stay in touch on Facebook, Twitter, and Pinterest for all of the latest updates
As a wife, mom, and caffeine enthusiast, my journey has taken me from bustling mornings with my family to sharing delicious recipes, home care tips, and heartfelt decorating insights with wonderful readers like you. My love for baking, photography, and tidiness shines through every post I craft. Dive into my world and discover the art of homemaking, one tidy moment at a time. Read more...
Tidymom is a participant in the amazon services llc associates program, an affiliate advertising program designed to provide a means for sites to earn advertising fees by advertising and linking to Amazon.com.
Please respect my work, recipes and photographs. If you do use a recipe in your own writing, please give proper credit and link back to the original post.
I love this idea. I just wish they made sturdier ziplock bags because after a while, they get “funny” and that would be a shame. I love that you used the potholders which have that ready made pocket in them.
I was thinking that sewing another piece of grosgrain ribbon down the middle of the potholder instead of just sewing over the plastic bags might aid in securing the bags more permanently than just sewing through the plastic. Whadya tink? :D:D:D
Donna
Mother of four daughters, Kaela, 20, Alexa, 17, Emme and Tess, 11
I was thinking the same thing! I’m still racking my brain to think of a way to make the ziplock baggies stay strong for long term!!
Sarah —
You could try putting colored duct tape over the end of each baggie where it will be sewn. that would make it a little sturdier in the middle and keep them from ripping sooner.
Just a thought… I’m sure someone may have said it already, but why not just use the already built in pocket on the pot holder (where you slip your hand in usually)… or at least us it also!!! This is so cute and such a fun easy project!!!
I might just keep some note paper (having recycled it from some cute colored paper left over from the kids’ school announcements) along with the aforementioned pens in the outside pockets – – – also a great place for a few business cards.
Just the very idea of turning a pot holder into something like a purse is awesome. I’m definitely going to do this project. Great to have when travelling. 🙂
These are a SUPER cute idea. I am making one for the ladies in my family! My 2 sisters and my mommy 😀 Can’t wait till they see this! I think I might even make one for the guys in my family but with more masculine colors and some guy items 😀
Years ago my sewing group made a similar project from a fabric placemat using multiple size zipper style bags. I preferred thicker freezer bags with sliders. We also used a wide piece of grossgrain ribbon to secure the bags in the middle. We added pockets and other embellishments. They started out as sewing kits, but evolved into other mulitpurpose holders. One of our young members turned them into gifts for college kids with stationary, stamps, addresses…
Found this from Pinterest! (Gotta love that site right??!!) I am planning to make this tomorrow BUT for the sole purpose of using for my “monthly time” bag. This would be much nicer and discrete than having to lug my huge purse into the bathroom when were visiting family and stuff. Or trying to hide something up a sleeve! I think I am going to try freezer bags. Or maybe I will put the pocket on the inside and use that to stash a few things in! 🙂 Great Idea! Thanks for sharing!
Hi! Thanks so much for this tutorial. Found it on Pinterest. I just finished making a batch to give as gifts (and one for myself, of course!) What an awesome idea!! …I couldn’t find any cute potholders with pockets, but the ones I did find already had a loop that I could use for the button hole. I sewed a ribbon over the baggies like one commenter had suggested and it looks great. Can’t wait to fill them and give them out!
I am the co-leader, the crafty and creative one, for my 7 year old daughter’s Girl Scout troop. Her troop is a Daisy troop with part of the girls getting ready to “bridge” to Brownies. Having just found this on Pinterest, this is perfect timing for me to whip these up as “gifts” for my girls that are bridging. I will probably make them for all the girls though. These are such an easy and AWESOME idea…I can hardly wait to get started! Not an expensive project either!! I like the idea for our feminine products and I think these would be PERFECT for a diaper bag too, to keep all those “little things” together that are always loose on the bottom of the bag! Thanks to TidyMom for posting this!!
I am making these for Mother’s Day, and I am using pot holders that already have a loop on one side, so I am only having to stitch down the middle, and then hand sew a button. Great project!
This is exactly what I was trying to come up with, for my granddaughters summer project. Great to have an emergence pouch in her backpack . It’s a perfect sewing project for her . And so useful.
I haven’t read all of the comments so I’m not sure if anyone else has suggested this: cut a square of clear shelf paper to stick to each side of the storage bags before layering– this would give them some more strength while still being transparent (enough) to see the contents of each bag. I’m not sure if this will make it harder to sew through the layers, though…
This is so cute! But I’m having a bit of trouble. My zigzag won’t stitch! The needle just pokes through the bags and makes something of a straight stitch on one side and my thread is all bunched up and nasty on the back. Is it a sewing machine problem or am I missing a step? Maybe putting the ribbon down the middle would help…
Analee, that’s a thread tension problem. Clean out your bobbin case, rewind your bobbin thread, and rethread your machine. You may have to experiment with your top thread tension too; and when sewing thick layers, make your stitches longer. Hope that helps!
I love this! I think I will make one and attach a small handle to it for my toddler. I can fill the pockets with crayons, stickers, paper, and other odds and ends to keep her busy at doctor’s appointments and what not.
Saw this on Pinterest. Thanks so much for this idea. I just made one of these as a bridal shower gift for my sister (a wedding day emergency kit) and loved it so much I had to make one for myself. It has even made it to my list of homemade Christmas gifts to give to my sisters-in-law. Your tutorial made it super easy to create my own. Thanks again for sharing.
Wow, these are a great idea. I have my son and daughter in laws baby shower this weekend. I’m using a couple of these as gifts for the games. Thanks for coming up with something inexpensive and unique. May be making a bunch for Christmas gifts. 🙂
I will be having a baby in a couple of months and this will be perfect for all the little things you need to take to the hospital when in labor like ids and medical cards, chappystick, gum or mints, tissues, change and dollars for the vending machine! The possibilities are endless, thank you for the awesome idea! I hate carrying a purse so even better!
Found on pinterest, of course. This is a genius plan to help get a girl (or boy) to practice hand sewing, as well as being prepared for whatever it is that they might need. I think I will modify it a tiny bit by taking a couple of bandanas and folding them (somehow) so that there are pockets to be hand sewn in – to hold the zip lock bags.
I am a “Band Mom” for my son’s marching band students.. I made one of these to take for games and contest, with anything and everything I thought may be needed. Little did I know how useful it would be the very first night! 😀
i wonder if you could find fabric pencil cases small enough to use instead of ziplocs? woud add to cost, but then it wouldnt fall apart… several negatives such as not being able to see whats inside etc…hmmmmm…possible solution…but i think can come up with something better
Hi, Susannah. I am kicking around a no-machine idea myself. I have found some clear zippered pencil pouches at the dollar store (they have holes that are designed to fit into a notebook) and an oblong potholder– I think that a button hand-sewn through a couple of the holes of the pouches would secure them– I haven’t played much with it yet but think it would be a nice alternative if not a little more expensive.
I love this idea and to customize it for girls and guys of any age, for any event or just becasue. For those of you who are handy with a sewing machine why not use old denim jeans and cut squares the size of a potholder, maybe using a back pocket peice for the outside layer. This would work great for repurposing and also for the “guy” ones- put in toothpicks, band aids, mints, duct tape, small pocket knife, etc. My kids aren’t old enough yet but this would be great for a school backpack to carry lunch money, house key, contact info, etc that shouldn’t just be hanging around loose in the big pockets where it can get lost. I want to make these for a whole bunch of people as gifts…so practical and giving something I made is more personal for me and the receiver I think.
Made these years and years ago (10 years) and the bags have held up fine Use for fitst aid kit in the car, makeup kit, travel jewelry case and etc. We used the kind that had a loop for hanging so we had one less step we taught our youth group to make these at girls camp (ages 12-18). They loved them!
I love this idea. I plan to make some for my family and possibly for gifts. I would like to try and make this something to hold your silverware (or at least the knives) in a mess kit. I always worry about the knife just floating around in a mess kit and reaching in the dunk bag without seeing inside. You could also use the oven mitt part ot hold food that may be too hot! Any suggestions on how this could be done?
I just made this bag for daughter who is in college. I put ” necessities” in it for her to keep on her car or purse. I sewed a pice of hemming lace down the middle and on the outside as mine did not have the pocket. It is awesome. I am going to make one for my nieces and myself
Aw, this was a really nice post. Finding the time and actual effort to create a great
article… but what can I say… I procrastinate a whole lot
and don’t seem to get anything done.
I saw a ton of people saying the Ziplocs wore out fast… So I am going to make one with inexpensive cotten so I can toss the whole thing when the bags get stretched out. A little more handy that way, but still cute!


I love this idea. I just wish they made sturdier ziplock bags because after a while, they get “funny” and that would be a shame. I love that you used the potholders which have that ready made pocket in them.
I was thinking that sewing another piece of grosgrain ribbon down the middle of the potholder instead of just sewing over the plastic bags might aid in securing the bags more permanently than just sewing through the plastic. Whadya tink? :D:D:D
Donna
Mother of four daughters, Kaela, 20, Alexa, 17, Emme and Tess, 11
I was thinking the same thing! I’m still racking my brain to think of a way to make the ziplock baggies stay strong for long term!!
You could try putting colored duct tape over the end of each baggie where it will be sewn. that would make it a little sturdier in the middle and keep them from ripping sooner.
yes, yes AND YES! I keep an emergency kit in the trunk of my car. You never know when you’re gonna need something!
Just a thought… I’m sure someone may have said it already, but why not just use the already built in pocket on the pot holder (where you slip your hand in usually)… or at least us it also!!! This is so cute and such a fun easy project!!!
I might just keep some note paper (having recycled it from some cute colored paper left over from the kids’ school announcements) along with the aforementioned pens in the outside pockets – – – also a great place for a few business cards.
Love this!!! Featured it on my blog today:
Thanks!
Suz from WelltoDo
I just wanted to let you know I included this in my 2011 Ultimate DIY Gift Guide (101 tutorials/recipes)! 🙂
Just the very idea of turning a pot holder into something like a purse is awesome. I’m definitely going to do this project. Great to have when travelling. 🙂
These are a SUPER cute idea. I am making one for the ladies in my family! My 2 sisters and my mommy 😀 Can’t wait till they see this! I think I might even make one for the guys in my family but with more masculine colors and some guy items 😀
I LOVE this!! So fabulous & inexpensive. Definitely a must make.
Years ago my sewing group made a similar project from a fabric placemat using multiple size zipper style bags. I preferred thicker freezer bags with sliders. We also used a wide piece of grossgrain ribbon to secure the bags in the middle. We added pockets and other embellishments. They started out as sewing kits, but evolved into other mulitpurpose holders. One of our young members turned them into gifts for college kids with stationary, stamps, addresses…
this is a brilliant idea!!
Found this from Pinterest! (Gotta love that site right??!!) I am planning to make this tomorrow BUT for the sole purpose of using for my “monthly time” bag. This would be much nicer and discrete than having to lug my huge purse into the bathroom when were visiting family and stuff. Or trying to hide something up a sleeve! I think I am going to try freezer bags. Or maybe I will put the pocket on the inside and use that to stash a few things in! 🙂 Great Idea! Thanks for sharing!
LOVE this! I love semi-homemade! Thanks for sharing!
Super cute idea! And I was excited to see that you call pacifiers “mimis” at your house too!
this is so cool, the colors combination also lovely..
i will make one! thank you for the tutorial..
Hi! Thanks so much for this tutorial. Found it on Pinterest. I just finished making a batch to give as gifts (and one for myself, of course!) What an awesome idea!! …I couldn’t find any cute potholders with pockets, but the ones I did find already had a loop that I could use for the button hole. I sewed a ribbon over the baggies like one commenter had suggested and it looks great. Can’t wait to fill them and give them out!
🙂
I love this idea! How much do you think you could sell these for? How much would you pay?
I am the co-leader, the crafty and creative one, for my 7 year old daughter’s Girl Scout troop. Her troop is a Daisy troop with part of the girls getting ready to “bridge” to Brownies. Having just found this on Pinterest, this is perfect timing for me to whip these up as “gifts” for my girls that are bridging. I will probably make them for all the girls though. These are such an easy and AWESOME idea…I can hardly wait to get started! Not an expensive project either!! I like the idea for our feminine products and I think these would be PERFECT for a diaper bag too, to keep all those “little things” together that are always loose on the bottom of the bag! Thanks to TidyMom for posting this!!
I am making these for Mother’s Day, and I am using pot holders that already have a loop on one side, so I am only having to stitch down the middle, and then hand sew a button. Great project!
Wonderful tutorial! I featured you on my tutorial roundup! Thanks for sharing!
Caroline
Cold Hands Warm Heart Crafts
so i take it you tke all the tape off at the end right?
This is exactly what I was trying to come up with, for my granddaughters summer project. Great to have an emergence pouch in her backpack . It’s a perfect sewing project for her . And so useful.
I think these would be good teacher gifts too!
I love love love this idea! Have you come up with a way to use something other than the ziplocs? Something to make it more sturdy?
I haven’t read all of the comments so I’m not sure if anyone else has suggested this: cut a square of clear shelf paper to stick to each side of the storage bags before layering– this would give them some more strength while still being transparent (enough) to see the contents of each bag. I’m not sure if this will make it harder to sew through the layers, though…
This is so cute! But I’m having a bit of trouble. My zigzag won’t stitch! The needle just pokes through the bags and makes something of a straight stitch on one side and my thread is all bunched up and nasty on the back. Is it a sewing machine problem or am I missing a step? Maybe putting the ribbon down the middle would help…
Analee, that’s a thread tension problem. Clean out your bobbin case, rewind your bobbin thread, and rethread your machine. You may have to experiment with your top thread tension too; and when sewing thick layers, make your stitches longer. Hope that helps!
these also make good flash drive holders
I love this! I think I will make one and attach a small handle to it for my toddler. I can fill the pockets with crayons, stickers, paper, and other odds and ends to keep her busy at doctor’s appointments and what not.
Never saw this, what a great idea!!! Pinning it for later;)
Saw this on Pinterest. Thanks so much for this idea. I just made one of these as a bridal shower gift for my sister (a wedding day emergency kit) and loved it so much I had to make one for myself. It has even made it to my list of homemade Christmas gifts to give to my sisters-in-law. Your tutorial made it super easy to create my own. Thanks again for sharing.
Wow, these are a great idea. I have my son and daughter in laws baby shower this weekend. I’m using a couple of these as gifts for the games. Thanks for coming up with something inexpensive and unique. May be making a bunch for Christmas gifts. 🙂
What a wonderful idea. I think it would make a great travel jewelry case too. LOVE IT!
I will be having a baby in a couple of months and this will be perfect for all the little things you need to take to the hospital when in labor like ids and medical cards, chappystick, gum or mints, tissues, change and dollars for the vending machine! The possibilities are endless, thank you for the awesome idea! I hate carrying a purse so even better!
Found on pinterest, of course. This is a genius plan to help get a girl (or boy) to practice hand sewing, as well as being prepared for whatever it is that they might need. I think I will modify it a tiny bit by taking a couple of bandanas and folding them (somehow) so that there are pockets to be hand sewn in – to hold the zip lock bags.
I am a “Band Mom” for my son’s marching band students.. I made one of these to take for games and contest, with anything and everything I thought may be needed. Little did I know how useful it would be the very first night! 😀
i wonder if you could find fabric pencil cases small enough to use instead of ziplocs? woud add to cost, but then it wouldnt fall apart… several negatives such as not being able to see whats inside etc…hmmmmm…possible solution…but i think can come up with something better
Beautiful colours and design but the botton thing isn’t practical for me; a zipper takes more time but makes sure everthing is inside.
This may have already been brought up, but if you find potholders that already have a loop for hanging, you don’t need the ribbon for a button loop.
The perfect glove box accessory!
Gifting these.
I’ve been looking for something like this! My sewing machine is on the fritz. Is there a clever way to hand-sew these?
Hi, Susannah. I am kicking around a no-machine idea myself. I have found some clear zippered pencil pouches at the dollar store (they have holes that are designed to fit into a notebook) and an oblong potholder– I think that a button hand-sewn through a couple of the holes of the pouches would secure them– I haven’t played much with it yet but think it would be a nice alternative if not a little more expensive.
I love this idea and to customize it for girls and guys of any age, for any event or just becasue. For those of you who are handy with a sewing machine why not use old denim jeans and cut squares the size of a potholder, maybe using a back pocket peice for the outside layer. This would work great for repurposing and also for the “guy” ones- put in toothpicks, band aids, mints, duct tape, small pocket knife, etc. My kids aren’t old enough yet but this would be great for a school backpack to carry lunch money, house key, contact info, etc that shouldn’t just be hanging around loose in the big pockets where it can get lost. I want to make these for a whole bunch of people as gifts…so practical and giving something I made is more personal for me and the receiver I think.
Made these years and years ago (10 years) and the bags have held up fine Use for fitst aid kit in the car, makeup kit, travel jewelry case and etc. We used the kind that had a loop for hanging so we had one less step we taught our youth group to make these at girls camp (ages 12-18). They loved them!
I just made these to give to our swim team coaches as gifts. Thanks for sharing the idea!
Hi –
I love this idea. I plan to make some for my family and possibly for gifts. I would like to try and make this something to hold your silverware (or at least the knives) in a mess kit. I always worry about the knife just floating around in a mess kit and reaching in the dunk bag without seeing inside. You could also use the oven mitt part ot hold food that may be too hot! Any suggestions on how this could be done?
Laura
I LOVE this idea! This would work great for my knitting notions too! Thank you for sharing, and Merry Christmas!
I just made this bag for daughter who is in college. I put ” necessities” in it for her to keep on her car or purse. I sewed a pice of hemming lace down the middle and on the outside as mine did not have the pocket. It is awesome. I am going to make one for my nieces and myself
Super adorable!
Aw, this was a really nice post. Finding the time and actual effort to create a great
article… but what can I say… I procrastinate a whole lot
and don’t seem to get anything done.
So clever idea! Thank you for shearing it!
I saw a ton of people saying the Ziplocs wore out fast… So I am going to make one with inexpensive cotten so I can toss the whole thing when the bags get stretched out. A little more handy that way, but still cute!