Trick or Treat? Faux Caramel Apple {craft}
This post may contain Amazon or other affiliate links. As an Amazon associate, I earn from qualifying purchases.
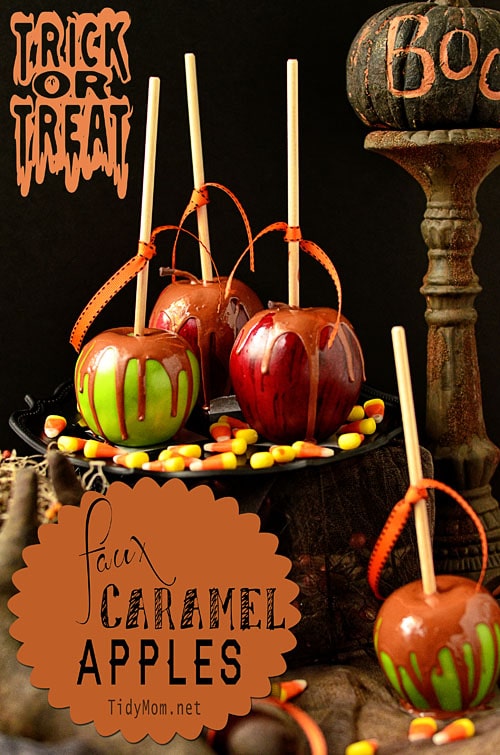
Decorating my home for the cool weather season often involves bringing in natural elements to add warmth to our rooms. Gourds, pumpkins, dried corn cobs, acorns and leaves all have an autumn feeling when I add them to our decor. Caramel apples are a fall classic, but too perishable to be used for decor. So, this year I created a plate of faux caramel apples! Perfect for a warm fall kitchen without worrying about spoiled food ruining the look.
So, today I have a caramel apple tutorial to share with you that has ZERO calories!
That’s right! you read that correctly………..ZERO calories! that’s because you don’t eat these little treats…..they are a trick!! get it?! Trick or Treat? that’s what people will be asking when they see these beauties sitting on your counter or how cute for Halloween Party decor!
Faux Caramel Apples are really pretty easy to make.
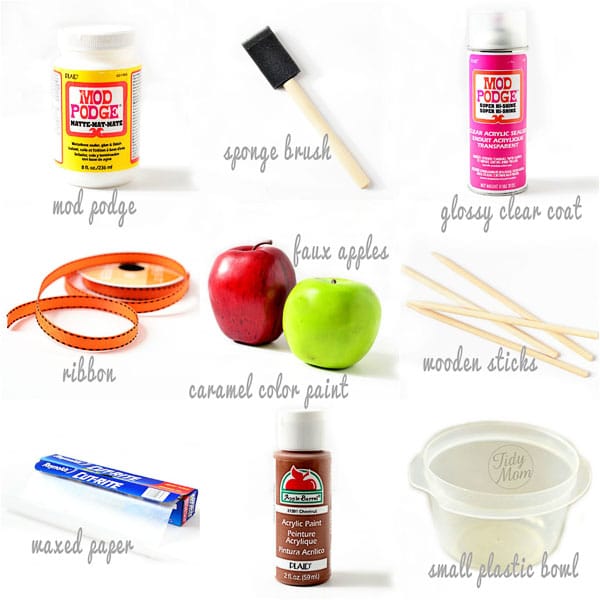
What you’ll need:
- Faux (fake) Styrofoam apples (check Walmart or the Dollar store)
- Mod Podge Matte
- Craft Glue in a caramel color, I used Apple Barrel Chestnut
- wooden sticks or popsicle sticks
- sponge brush or spoon
- waxed paper
- small plastic bowl or cup
- Glossy clear top coat, I had Mod Podge Super Hi-Shine Clear Acrylic Sealer on hand
- *Opional* corn cob liter (not pictured or used), use this if you want “nuts” on your apples
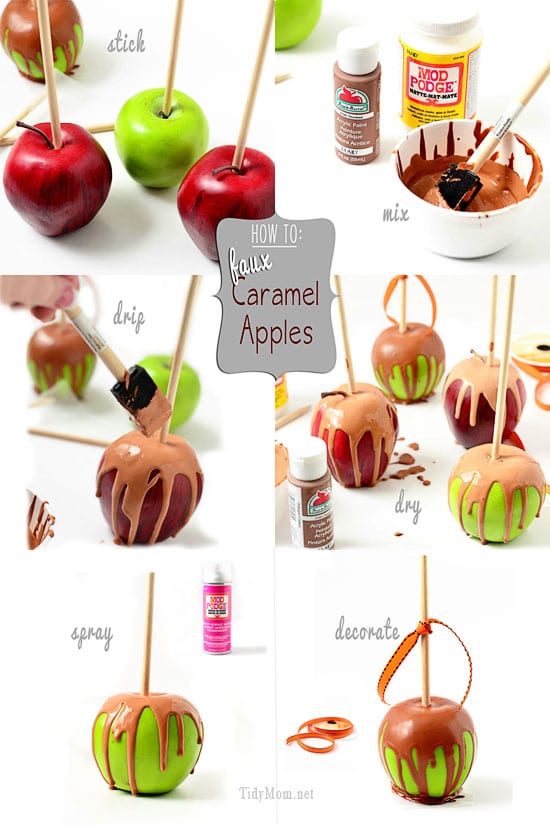
Now that you have all your supplies, let’s get started making our faux caramel apples.
- Insert sticks into apples. If you have a hard time, you could cut a small slit/hole with a steak knife, but mine went in just fine.
- In a small bowl or cup mix Mod Podge with paint, using wooden stick or plastic spoon to stir. The amount of glue and paint you will use depends on how many apples you make and how much you want to cover them. I used about 1/3 of my bottle of Mod Podge and squeezed just a little paint in until I got the color I wanted. The glue mixture will dry darker, so keep that in mind.
- Cut a piece of waxed paper large enough to set all of your apples on. Place your apples on the waxed paper, and using a sponge brush or or spoon, pour the glue mixture over the apples and let it run down the sides. I wanted to leave quite a bit of apple showing, but you can certainly cover them in more “caramel” if you wish.
- *optional* I did not do this step, but if you would like your caramel apples to have nuts on them, you can sprinkle them with corn cob liter (look in WalMart by small pet supplies or pet store) while the glue mixture is still wet. I could only find pretty large bags of corn cob litter , and since I only needed a very small amount, I just couldn’t bring myself to by a whole large bag to only use like 1/4 of a cup.
- Let apples sit over night to dry completely. (if you have a large pool of glue mixture under your apples, you may want to move them to a fresh piece of waxed paper while drying, so that pool doesn’t dry with your apple.
- After 24 hours spray with a glossy clear coat and tie a pretty ribbon on the stick and you’re done!
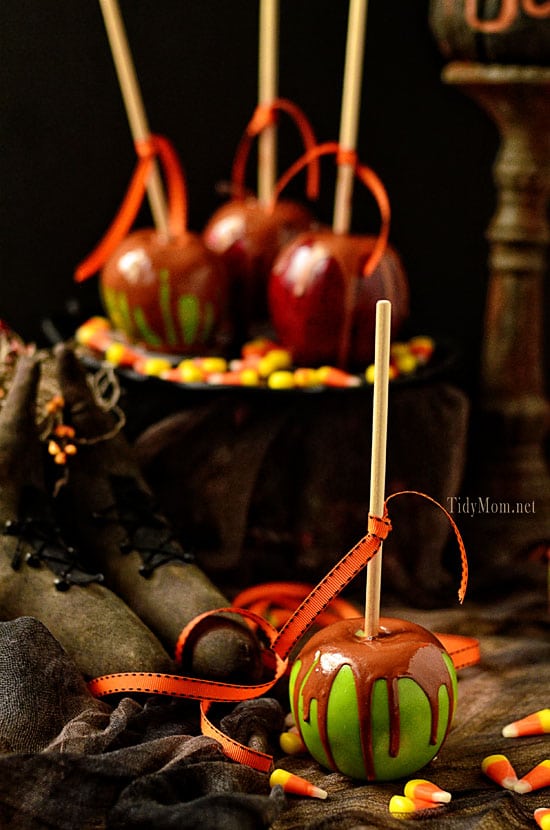
See how easy that was? They look really cute on a plate with candy corn or you could bag them and put some cute tags on them.
Wouldn’t they be cute for a Halloween party, you could use them at each place setting with each guest’s name card tied on to the stick! Just be sure to let everyone know they are NOT real, because they really do look like a delicious Happy Apple!
So tell me, do you like caramel apples? and if so with our without nuts? My husband will only eat them with out nuts, and they are harder to find at the store, so we usually have to make at least one batch to eat each season.
Some REAL Caramel Apple Recipes you may enjoy:
Vanilla Bourbon Caramel Apples
Caramel Apples with Vanilla Bean Sea Salt Caramel
Tidymom is a participant in the amazon services llc associates program, an affiliate advertising program designed to provide a means for sites to earn advertising fees by advertising and linking to Amazon.com.
Please respect my work, recipes and photographs. If you do use a recipe in your own writing, please give proper credit and link back to the original post.



too cute for words Cheryl! So creative
Ok, this is super cute. I want to do this. My problem…my twins are trying to take bites out of anything remotely looking like an apple (like a tomato, a red bell pepper…) so something that looks that good, well, it’s sure to cause a temper tantrum and little voices chanting “bapple, bapple”. So I’ll have to wait a little longer…
That is so cute HMMM I think I need a stop at the craft store ASAP!
that is so fun, and I bet you will use them for years.
How cute are these?!? They look so real, I bet one of my kids would try to take a bite. 😉
Super cute!! I’m with Sommer… my 3 year old would try to eat them, I bet. They look good enough to eat, for sure!
I love these, Cheryl!! I love caramel apples (real ones) haha, and these would be perfect for decorating!! I love how “real” these look!
How fun! I will have to try these!
L-O-V-E it! Pure brilliance for decor or a ‘trick.’ Thanks so much for sharing the how-to!
OH wow! Super cute!
GAAAAHHHHH! L. O. <3. E. !
You are brilliant! A decorators treat and a great trick! I have often wished to find fake candy apples to decorate with! These are awesome! Thanks for sharing your great idea! 🙂
Holy mole Girl these look so real! What a cute idea, though I don’t think I could ever get over the idea I wouldn’t get my hands sticky by touching them they look so authentic. Really brilliant. Wish you lived next door; what a fun craft project!
They turned out cute! I made some a few years ago and they have held up so well. They are one of my favorite Halloween decorations.
They fooled me! What a cool little Trick! lol BRAVO!
How adorable is that! Probably takes less time than making actual caramel apples too. 🙂
LOVE this craft Cheryl!! So beautiful 🙂
Those are so cute! They look very real! Love it 😀
Absolutely adorable and so realistic!
These are soo STINKIN’ CUTE!! I LOVE it!!
This is such a fun idea! Who knew that styrofoam apples and paint could make me so hungry?
What a good idea! They look darling!
I absolutely love this idea Cheryl and I’m delighted that I have most of the supplies on hand. Just need to run out tomorrow and get me some applies. I can’t wait to *fake-out* the grand-kids with these (just better have a real treat close by when they realize that they can’t eat these fabulous candy apples!)
I was seriously ready to take a bite. Wow, they look so real!
Those look good enough to eat, and I love the decor in the background of the pictures too!
What a fun idea – they look so real, I’d have to make sure I didn’t take a bite!
SO adorable, Cheryl!!! Love! 🙂
I would so be the person who walked into your house and tried to take a bite of those. They look so real to me!
I love these! I wish I had thought of that! I would love to use it as a decoration~! You rock!
Kim
Well, now that’s just mean! They look so delicious… and they’re fake! What a fun craft!
This is a really great alternative to all of the scary stuff. My daughter who is just a little over two hates ghosts and the like. But she definitely won’t mind these cute apples. Thanks!
Brilliant! I so adore these! My toddler would be licking them all day 🙂 Perhaps I should wait till the kids are older?
Love this! Thanks for sharing! Pinned! ~Sheryl @ Lady Behind The Curtain~
How fun is this!?! Just have to make sure no one tries to take a bite~haha! Love the idea of using them at each place setting:)
LOVE these, so creative and they totally look real! I’d love for you to link this project up to Do Something Crafty Friday:
If you hadn’t told me these were fake, I never would have known!
These are awesome! They look so real that I could totally see my kids picking one up and taking a bite! Thanks for the tutorial!
Such a fun craft! These are gorgeous!
Gorgeous photo! I love the way the “caramel” is dripping down the apples. Simply beautiful!
what a fun idea, Cheryl! I am going to do this with my kids
I wonder how many people have commented how delicious these look ; ). What a cute idea!
Hi, Cheryl. These look adorable! Thank you for sharing. I am thinking of making these as a centerpiece for a table for my daughter’s bat mitzvah. I’m thinking of decorating a circular styrofoam disk with silver metallic paper, sticking the apples into them, and actually make candied apples cake pops to use as favors for that particular table. She wants a sweets theme, so every table will look different from the next and I am going to make all the centerpieces at the tables. Thanks again for the idea!!! 🙂