Easy Patriotic Flag Wreath
This post may contain Amazon or other affiliate links. As an Amazon associate, I earn from qualifying purchases.
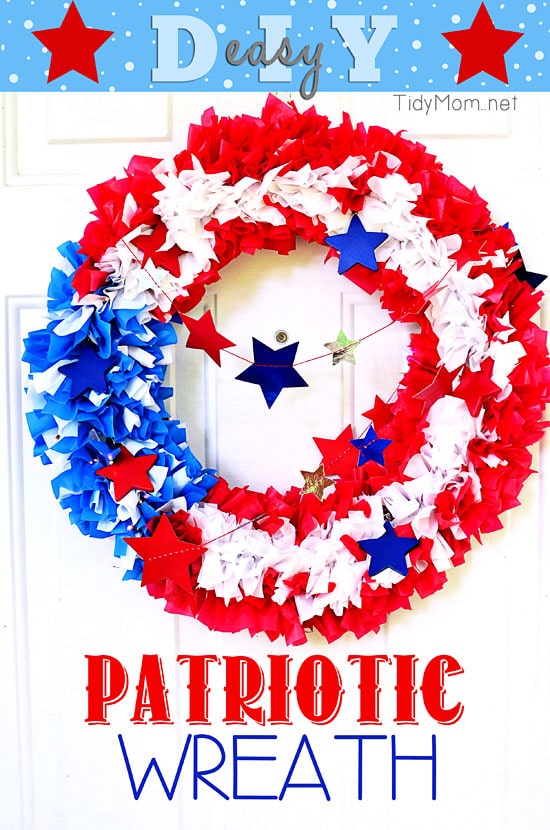
By using plastic tablecloths you can make your own outdoor patriotic flag wreath!
Don’t you love it when you have an idea and the finished product turns out ever better than you had hopped? That’s what happened when I made this patriotic flag wreath.
I had been surfing around pinterest one day, when I pinned an idea for an outdoor red white and blue garland using cut up plastic tablecloths. I quickly pinned it and tried to tuck the idea in the back of my mind. As we were packing up all of our belongings to move, I looked at my sad stash of wreaths for our front door and realized most of them had seen their better day, and realized I might want some new ones, for the new house.
No sooner than that though crossed my mind, so did the plastic tablecloth garland and I wondered if I couldn’t apply that same idea to a wreath for summer!!
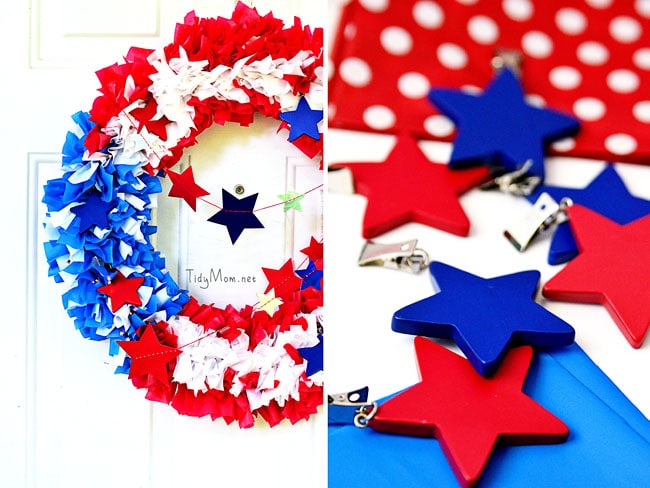
All you need is pretty simple, a wire wreath form (craft supply store) and red, white and blue plastic tablecloths. I picked mine up at Target, where the party supplies are. Notice the cute red polka dot tablecloth – I thought it would be cute, but decided not to use it. I wish they had blue polkadot, then I would have used that for the star section……..but I thought the red polka-dots for the strips would be odd, so I will save it for another project.
I also picked up some cute star tablecloth weights that I knew would be so easy to add to my wreath, and I also picked up a little star garland (I couldn’t find when I was taking this picture —-blame it on the move, I had such a mess all around me at the time ).
The garland I had pinned was attached to a light strand, so I found some battery power mini lights that I attached to the blue star section of the wreath, to make the “stars” light up. (you can’t really see them in my pictures, but it looks cool when it gets dark.
How to make a Patriotic Flag Wreath
Supplies:
- Wire wreath form
- 1 red, 1 white, 1 blue plastic tablecloth
- star garnishments (ie: tablecloth weights or string garland)
- battery powered lights
- scissors
This wreath was super easy to make, just a little time consuming. It’s a great project to get the kids to help with!
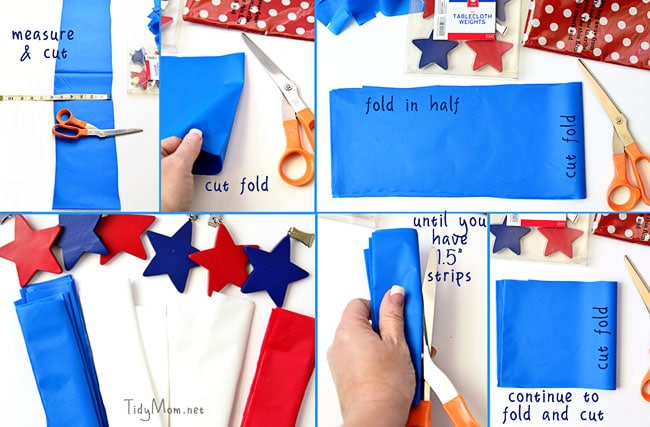
Start by cutting the table cloths.
- open the tablecloth and keep it folded in half (by the short end) – cut a 6-inch piece across the top
- it was folded in half, so you need to cut that fold
- then fold the piece in half again, and cut that fold
- continue to fold in half, and cut the fold until you end up with pieces about 1-1/2″ wide. (these do not need to be perfect)
- I didn’t count how many I used, I just cut several, and cut again when we needed more. Do this with all three colors (you’ll need the least amount of blue)
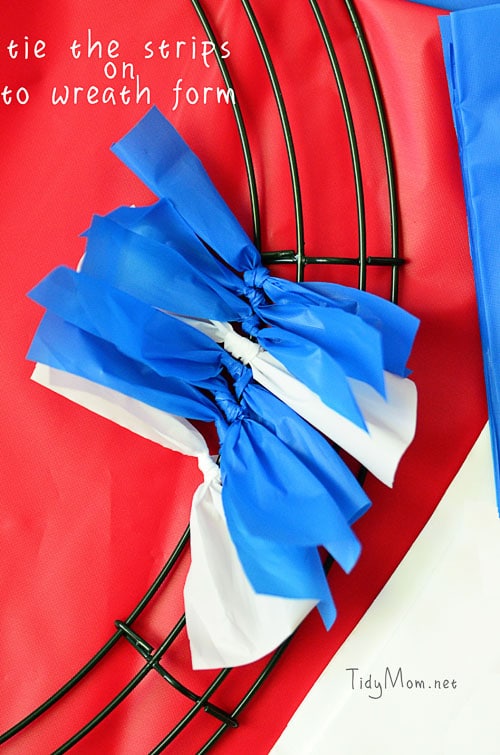
Tie the strips on to wreath form
- the plastic strips will really stick together, so I found it to be easier if I separated them before I started the next step (this is a great task for kids!)
- Then you simply tie the strips onto the wreath form
- for the “Blue Star” section I tied 3 blue then 1 white, 3 blue one white to 2 sections of 3 rings of the wreath (I did not use the outer ring)
- Next I tied red strips to the rest of the inner ring, then white to the next ring and another row of red to the 3rd ring (again, I did not use the outer ring)
All of the cutting and tying took a few hours, but my 16 year helped and that made a huge difference!!
Add Lights and Stars
After I tied all the strips I fluffed them up and added the lights to the blue and white section. I used a few longer strips of the tablecloths to tie the lights to the back of the wreath. Then I attached the stars and I was done!!
I now have a fresh new summer wreath for my front door!
What do you put on your front door for the summer?
This summer inspiration is brought to you by Target. Find more fun and surprises all season long on Target’s #SummerUp Pinterest board.
Tidymom is a participant in the amazon services llc associates program, an affiliate advertising program designed to provide a means for sites to earn advertising fees by advertising and linking to Amazon.com.
Please respect my work, recipes and photographs. If you do use a recipe in your own writing, please give proper credit and link back to the original post.




Cheryl, this is the cutest! What a fun family project to help create some festive fun for the 4th of July holiday! (I think you meant cloths and not clothes though, in 4th paragraph 1st sentence?) LOVE THIS! Good luck with your move! 🙂 Pinning at Pinterest! xo
got it fixed!! thanks for catching the typo! 😉
Love this Cheryl; it’s putting me in a Fourth of July mood! Also love when a project I envision comes out better than I expected. I’m sure this wreath will be on many a door in the next week!
Very creative – can’t believe you used plastic tablecloths to make this!
Now that is super cute!
This is adorable. But one question, how did u hide the obnoxious battery pack for those lights? I hate those things and have used them in my Christmas wreaths but I always have issues with hiding that pack. Thanks!!
I forgot to take a picture of it – but it’s just tied on to the back – I used a longer strip of the tablecloth and used it to tie the battery pack onto the wire wreath.
So cute Cheryl & I love that it’s weather resistant too.
this is the cutest!!! love it!
Great idea! It should be more durable for outdoors.
Wow! Such a clever and creative idea! Love it Cheryl!!
Super cute!! I love how easy it is!! Thanks for the tutorial!! Love it!!
That is so cute…I love it!
I love it … pinned it and hopefully making it 🙂
Super cute!
Love this! Did you use the dot table cloth?
No, I mentioned in the post that I decided not to use it.
I wish it came in blue, it would have been good for the star section – but once I got started I thought the red polk-a-dot wasn’t such a good idea and only used the solid
How fun! I really need to get some sort of decoration up for the 4th!
Love this idea!
oh, seriously LOVE this!!!!
Great craft idea and tutorial!
Very pretty! It just so happens that I picked up my own supplies for a Fourth of July wreath today! Have to get started on it.
Super cute!
This is such a awesome wreath! If you get a chance, please share this on my linky party
I LOVE this! Awesome job.
This looks awesome!!! We would love it if you would link up at our linky party
Live every Wednesday to Sunday.
Hosted by
Parrish @ Life with the Crust Cut Off
Dana @ This Silly Girl’s Life
We hope to see you there!
This is genius! I never would’ve guessed this was made out of tablecloths, but now you’ve opened up a world of possibilities im my head. Stopping by from Hoyby Crafts!
Cheryl,
This is a really cute idea! I’d like to make one for a friend who’s invited us over for a 4th of July barbeque. I just have a question. I am not clear on the measurements of the strips or the quantity. They are about 1-1/2 inch wide but how long? I tried to make sense of the directions- it looks as though you start with the cloth folded lengthwise and then fold and cut. Is that right?
Yes, I folded it in half then cut a 6″ piece………then I kept folding that piece in half and cut until it was about 1.5″ wide -so I had 1.5″x6″ pieces – but it doesn’t have to be exact – that’s just what I did
I love to see patriotic decoration ideas! Thanks for sharing this cool idea!
I loved this so much you inspired me to make my own! I did it a little different- I used embroidery hoops from the craft store and plastic table cloths from the dollar store- along with some wooden stars I already had- covered in washi tape or painted. Thanks for sharing such a cute idea- mine goes up tomorrow and I’ll let them know you inspired me! come visit me 🙂
How adorable! Looks like a great project to do with the kids to help celebrate the 4th! Thanks for sharing the crafty idea!
This is my first time visiting this site. I have bookmarked it so I can visit often.
Very pretty! Visiting from the All Things Summer link up! Feel free to also link this one up at our Ladies Only Blog Share Link Party. Our theme this week is Red, White & BBQ! This fits nicely. 🙂
Hi, I love this Wreath. I am planning on making one. Did you get your Star Clips at Target also?
Thanks! Beth
I made this wreath and it turned out fabulous. The cutting of the table cloths was not bad but tying the pieces on the wires took some time. No lights on mine but the stars look great. Thanks for the great idea. I love the 4th of July!
I did something similar to this years ago. I used an old foam wreath, old plastic bags, pins & spray paint. I rotary cut the bags into strips, pinned them onto the foam wreath until it was covered. Then I spray painted different colors onto the wreath. I added some ribbons, misc. flowers and viola! Funky spring time wreath for my door. It was also a great way to use up all those misc. flower heads that fall off the bunch–I can’t bear to throw them away so I toss them in a bin and use them on projects like this. It was fun, cheap decorating that people think you spent a lot of money on–and I just let them think that!!!
SO fun—and easy enough that I think I could tackle it 🙂
What a fun, easy idea!
Fun 4th of July decor! Great tutorial, too!
I love this wreath Cheryl!! Seriously so cute.
This is seriously amazing Cheryl!!!! You inspire me!
I am so envious of your craftiness!!! What a festive wreath. I imagine your whole house to be so creative.
I LOVE this! And it looks easy enough for me to do and I’m craft challenged. 🙂
I LOVE this festive wreath. We are hosting our family reunion over the holiday weekend so I may just have to make this so I can wow the family! 🙂
This is adorable!! Do you happen to know how big your wire wreath was? Off to get the supplies to make one for our door!!
you can really use any size you want. 😉 have fun!!