Royal Icing {recipe} SnowFlake Cookies
This post may contain Amazon or other affiliate links. As an Amazon associate, I earn from qualifying purchases.
Blue and white snowflake butter cookies are the perfect welcome to the winter holidays decorated with royal icing.
The holidays are HERE!! A time when adults can stop being so serious, and indulge in childlike wonder and enjoyment of the world. That also means a time of unadulterated TREATS!
I was so excited when my good friend Amanda asked if I could make some cookie treats to cheer up another friend. She decided on snowflakes!
I was thrilled to try out my new copper snowflake cookie cutter I got while visiting the Culinary Institute last month and I knew I would have no trouble decorating since Bridget gives such fabulous step-by-step instructions on how to decorate a snowflake cookies with Royal Icing. The one thing I did differently than Bridget……I used a #3 tip. I find that I can control the outlines and design much easier with the #3 since it’s a little larger than the #2.

This post may contain affiliate links. Please read my disclosure policy here.
Amanda thought blue and white would be a nice touch rather than the traditional all-white snowflake, and I just love how the color combination turned out! I used pearl dust instead of sanding sugar, and I wasn’t thrilled with it…..it hardly shows up. So when I do snowflakes again, I’ll use sanding sugar for sure, because Bridget says too! haha
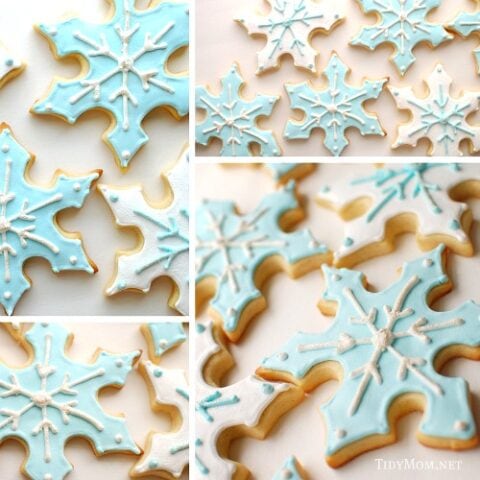
Table of Contents
Royal Icing
should cover 2-3 dozen 3.5 inch cookies in 2 colors
Ingredients
- 4 TBSP meringue powder
- 1/2 cup water
- 1 pound powdered sugar (SIFTED)
- 1 teaspoon. light corn syrup
- few drops clear extract (optional) I usually add a little vanilla & a little almond
Instructions
- Beat all ingredients until icing forms peaks (7-10 mins at low speed with a heavy-duty mixer, then 10-12 mins at high speed with a hand-held mixer)
Notes
helpful video on how to make royal icing I also like to use this 20 second rule for icing consistency for some of my cookies
A few days after I made these cookies I found another use for the leftover Royal Icing!
I almost always have leftover icing, and I usually put it in an air-tight container and stick it in the fridge, and throw it out a week later because I don’t use it! lol Sometimes I wonder why I bother……….until this past weekend.
Allison had a biology project to turn in. She needed to make a 3D model of a plant cell. 
We bought clay.
We sat and starred at the clay……….and at the book/picture………..at the clay……….at the book.
Then Allison said, the teacher said we can use cake!
CAKE? SERIOUSLY?
So we brainstormed, and we did a little online searching…………and we came up with THIS!

We made a small cake and 12 cupcakes.
We used 3 cupcakes and chocolate frosting to make a giant cake ball, then covered it in white candy melts with a little purple food gel for the nucleus.
For the rest of the parts we used royal icing in several colors (dries hard so it worked great!), fondant , glitter icing, gummy worms, sour patch straws and nonpareils.


Hi there, I'm Cheryl!
As a wife, mom, and caffeine enthusiast, my journey has taken me from bustling mornings with my family to sharing delicious recipes, home care tips, and heartfelt decorating insights with wonderful readers like you. My love for baking, photography, and tidiness shines through every post I craft. Dive into my world and discover the art of homemaking, one tidy moment at a time. Read more...
Tidymom is a participant in the amazon services llc associates program, an affiliate advertising program designed to provide a means for sites to earn advertising fees by advertising and linking to Amazon.com.
Please respect my work, recipes and photographs. If you do use a recipe in your own writing, please give proper credit and link back to the original post.
Gorgeous cookies! 🙂
Love the cookies.. and the CAKE!!! AMAZING!! You have got some pretty awesome creative genes in your family!!!
Blessings-
Amanda
Those are very pretty snowflake cookies. I just bought a set of snowflake cookie cutters so my girls could make them for our family. I will use your tips to help us decorate. And that’s a hard project! But ya’ll pulled it off beautifully. Cake is more fun to play with than clay.
“because Bridget says too! haha”…..yes, Cheryl….always do as I say, LOL
Your cookies are BEAUTIFUL!!! Love the blue and white!
And the cake is SUCH a fun idea! I LOVE it! I hope she made an A!!!
Sooooo pretty!! I love them!! 🙂
I came right over as soon as I saw the PW tweet–are ya’ll besties now, or what? So jealous!!
I think the pearl dust looks very pretty, I myself am a fan of the Disco Dust. It’s super sparkly!!
beautiful Cheryl – particularly love the color of that frosting . . .
I love snowflake cookies, I think they were the first cookies I ever decorated 🙂 and that cutter is my favorite one. Love the colors! Great cell project, looks like a A.
Holy snow flakes, these are beautiful! I love the color combo. And great use of left over royal icing.
Those snowflake cookies are gorgeous!
Cool cake!
Your cookies came out really cute! I love the color blue on snow flakes cookies.
Pingback: Tidymom
Pingback: Amanda
Pingback: The Hip Hostess
Pingback: Ree Drummond
Pingback: bridget edwards
Those are the prettiest cookies, ever! Love them, Cheryl.
Who says baking isn’t a science! Great work on the project Allison and Cheryl, fantastic work on the snowflake cookies. So pretty.
Pingback: Open It
Pingback: TCreativeBlogs
Pingback: Heidi's Recipes
Oh, that cell cake is amazing! I can’t wait til my 3 year old has science projects and we can use sugary things. And I’m off to check off the tumblr how-tos! I need ’em.
Gorgeous cookies!!!
Love your snowflakes Cheryl. We must have been on the same wave length yesterday as I posted about them too. Like minds. 🙂
My guys also had to make the cell using all candy. I thought this was only in our neck of the woods. I can tell you time consuming projects are one thing I don’t miss about my boys getting older. Good job mom!
Cheryl!
These are my FAVORITE cookies you have ever made!
So MAGICAL!
Love the blue!
If I saw these in a little bakery…I’d have to take home a dozen or so!
Love!
Love!
Love!
Well done!
And I’m with you on that #3 tip! xo
Pingback: Indulge a Little
I LOVE your snowflake cookies! They are gorgeous! Congrats on the Top 9 today:)
Yes these cookies are beautiful & thanks for sharing the “tips!” with us. Great job on your daughter’s project too. Gotta check out your Tumbler tutorial now. 🙂
Pingback: Tidymom
Super cookies! I’d love for you to enter this recipe in my contest, 12 Cookies of Christmas: http://www.foodandwinechickie.com/2010/12/01/12-cookies-of-christmas-contest/
These are so beautiful. Wonderful job.
Ha! Too funny to see a post about a cell project. This is the first year (of the last 7) that I haven’t been a science teacher and I assigned an edible cell project to my honors classes each year! Nicely done with the cupcake nucleus! 🙂
Pingback: Veronique Deblois
Cute cookies, almost too cute to eat!
Pingback: Recycle Craft
Pingback: Genevieve Le Bel
Pingback: Genevieve Le Bel
Love the snowflake cookies. I usually take the shortcut and draw the snowflake on to a round cookie. These are so pretty!
These look divine!! I’m featuring them as Day 18 of my Blue and Silver Christmas.
Aloha and Mele Kalikimaka,
charlie
Those snowflakes are adorable. I really need to try my hand at making royal icing. The cookies just come out so beautiful.
I would be thrilled if you could link these up at our Cookie Party.
Here is the link:
http://www.cuteasafox.com/2010/12/incredible-christmas-cookie-party-soft.html
Thanks!
Ashley
I *love* the shape of those cookies! I can’t seem to find a cutter that I like. Might you have a link to where I can get beautifully pointy snowflake cutters?? These are gorgeous!