{DIY} Burlap Bulletin Board
This post may contain Amazon or other affiliate links. As an Amazon associate, I earn from qualifying purchases.
It’s so simple to dress up your office or room with this burlap bulletin board diy tutorial.

While I was in the middle of working on my new office, painting the walls and desk, I stopped for a quick little DYI project that I knew I would just love in my new space!
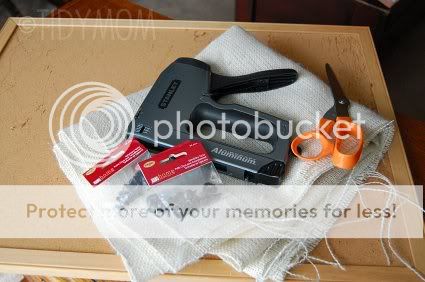
Supplies you will need:
a cork board – this was an old one we had laying around that the cat used as a scratching spot!
Staple Gun (a girl can’t live without one of these! Seriously if you don’t have one, you should get one!)
Burlap fabric – I bought a yard, and have some left over
Scissors
Upholstery Tacks – I used about 62 tacks the way I spaced them
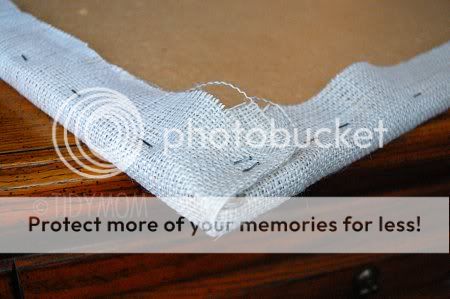
 Lay out the burlap on your cork board and cut so you have about 2″-3″ more on each side. Fold over frame and staple on the back side.
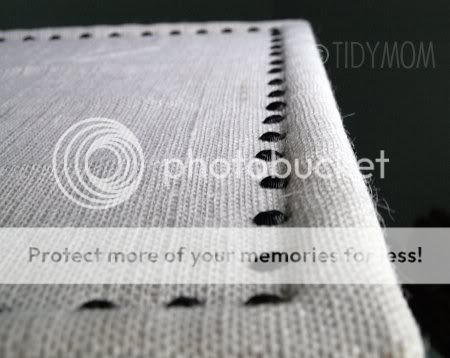
 Place tacks around the board just under the frame. I didn’t measure, but what I did was first I placed a tack in each corner, then a tack in the center of each side, then another tack in the center of each pair of tacks. I continued that was until I had the board filled. You could space them all butt up to each other, or you could space them out more and use less tacks.
That’s it!!! Easy Peasy!
Here’s a quick “before” shot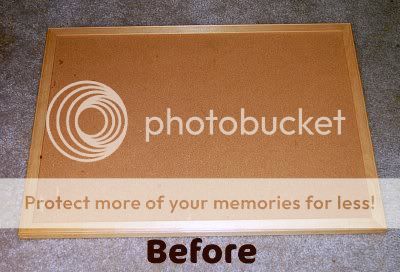
and after maybe 15 mins. – I bought those cute rustic clips and thought they looked perfect on each side of my new bulletin board!
I just LOVE how it turned out and I have a few more plans that include burlap in my new space!!
My new office space is coming along – I have pictures to share later this week, and a few more easy projects I did for the room!! I’m SO excited with how this room is turning out! Like a BREATH of FRESH AIR!


Hi there, I'm Cheryl!
As a wife, mom, and caffeine enthusiast, my journey has taken me from bustling mornings with my family to sharing delicious recipes, home care tips, and heartfelt decorating insights with wonderful readers like you. My love for baking, photography, and tidiness shines through every post I craft. Dive into my world and discover the art of homemaking, one tidy moment at a time. Read more...
Tidymom is a participant in the amazon services llc associates program, an affiliate advertising program designed to provide a means for sites to earn advertising fees by advertising and linking to Amazon.com.
Please respect my work, recipes and photographs. If you do use a recipe in your own writing, please give proper credit and link back to the original post.
Thank you for this! I have an old cork board that I've been wanting to re-cover, and was wondering what to do about the frame. . . now I know! Great idea.
Thank you for this! I have an old cork board that I've been wanting to re-cover, and was wondering what to do about the frame. . . now I know! Great idea.
So, so cute…I have a few bulletin boards sitting around here just begging for an adorable makeover like this! Thanks for sharing 🙂
Have a wonderful day!
~Michelle
(Treasure the Moment)
So, so cute…I have a few bulletin boards sitting around here just begging for an adorable makeover like this! Thanks for sharing 🙂
Have a wonderful day!
~Michelle
(Treasure the Moment)
This turned out very cute. I love the look of the burlap with nailhead trim.
This turned out very cute. I love the look of the burlap with nailhead trim.
What a cute project? Now I'm wishing I'd use less of the burlap I bought on the scarecrow and saved some for one of these 🙂
What a cute project? Now I'm wishing I'd use less of the burlap I bought on the scarecrow and saved some for one of these 🙂
So cute and easy! I founda giant bulletin board and a scrap of burlap just waiting to be used in my basement. It is a perfect fit and I can't wait to make it! Thanks for the inspiration Tidy Mom!
So cute and easy! I founda giant bulletin board and a scrap of burlap just waiting to be used in my basement. It is a perfect fit and I can't wait to make it! Thanks for the inspiration Tidy Mom!
What a cute and easy project! I found all of the supplies needed for this in my basement. I can't wait to make this! Thanks for your inspiration Tidy Mom!
What a cute and easy project! I found all of the supplies needed for this in my basement. I can't wait to make this! Thanks for your inspiration Tidy Mom!
How that's a GREAT bulletin board! I bought one at a yard sale a couple of weeks back and bought burlap just last weekend at the Goodwill. Can you see where I'm going with this? Love it! Thanks for the great idea!
How that's a GREAT bulletin board! I bought one at a yard sale a couple of weeks back and bought burlap just last weekend at the Goodwill. Can you see where I'm going with this? Love it! Thanks for the great idea!
Love the burlap and nailheads. Thank you!
Love the burlap and nailheads. Thank you!
Oh that is so cute! I am in the midst of building a craft room and this is going into my idea folder… err well it would if I had an idea folder 🙂
Oh that is so cute! I am in the midst of building a craft room and this is going into my idea folder… err well it would if I had an idea folder 🙂
Love this idea and I am stealing it as we speak. Love the "nailhead" trim. Absolutely love it. Found you by way of DIY Day and I'll be back!
Love this idea and I am stealing it as we speak. Love the "nailhead" trim. Absolutely love it. Found you by way of DIY Day and I'll be back!
I LOVE Burlap! I have a plain board now, this looks like a good idea for mine!!
I LOVE Burlap! I have a plain board now, this looks like a good idea for mine!!
That is a wonderful idea and it looks so GREAT!! Love it! Hugs ~cindy s~
That is a wonderful idea and it looks so GREAT!! Love it! Hugs ~cindy s~
What a cute and easy project. Where did you get that turquoise colored bird in front of the board? I absolutely love it.
What a cute and easy project. Where did you get that turquoise colored bird in front of the board? I absolutely love it.
I LOVE LOVE LOVE this! And I love your blog! I'm definitly a new follower! Thanks for the inspiration!
I LOVE LOVE LOVE this! And I love your blog! I'm definitly a new follower! Thanks for the inspiration!
What a FABULOUS way to use burlap!! I love this and I am sooo featuring this!!
What a FABULOUS way to use burlap!! I love this and I am sooo featuring this!!
Wow, that is so pretty, I love it. I just came by via U Create and I'm so glad I did. I would love to link to this project if you didn't mind.
Wow, that is so pretty, I love it. I just came by via U Create and I'm so glad I did. I would love to link to this project if you didn't mind.
I'm so glad I found you today via One Pretty Thing. I have been looking for a way to cover my bulletin board in a nice way without having to remove or cover (in a tacky way) the metal frame that surrounded it. It's a large office cork board that I got for free so I really wanted to make use of it. Thank You! I can't wait to get started on my inspiration board.
I'm so glad I found you today via One Pretty Thing. I have been looking for a way to cover my bulletin board in a nice way without having to remove or cover (in a tacky way) the metal frame that surrounded it. It's a large office cork board that I got for free so I really wanted to make use of it. Thank You! I can't wait to get started on my inspiration board.
I linked to your adorable board!!! Great job!
I am part of a group of volunteers that is starting a new scheme in our neighbourhood in Denver. One of the community projects that we are going to to initiate relatates to your blog, and therefor some of the information here is of value for us and I just wanted so say thank you for that.
I love this post! I actually just wrote a post a lot like this without seeing that you`d already put this up. I love how polished and neat the furniture tacks make the board- it really brings it to the next level. My post included different ways of using a big hunk of cardboard, including making a bulletin board out of it, but I think I like the finished result of a real bulletin board better 🙂
My handsome half has a staple gun around the house, but I think the staples might be too big. What size staple gun or staples (does a single gun use different staple sizes?) do you use usually? Is that what you used for this project?
This is so freaking cute! Thanks for the idea.