Thrifty Spring Centerpiece Craft from Kami of No Biggie
This post may contain Amazon or other affiliate links. As an Amazon associate, I earn from qualifying purchases.
I think you’re going to LOOOVE my special guest this week!! My friend Kami is a thrifty, crafty maven over at her blog, No Biggie. She always has something fun up her sleeve like she’s sharing here today!………take it away Kami……..
Hi TidyMom fans!
I’m Kami, and I blog at NoBiggie, nobiggie.net. I love to share crafts – recipes – thrift store finds – quick tips and pictures of my kids :). With a name like NoBiggie, I can get away with it all. 🙂
I’m thrilled to be here. Cheryl’s recipes and food photography inspires me. I’m excited to make some Easter cookies in the next few weeks.
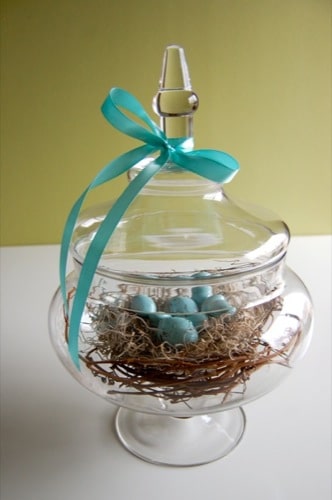
Today I’m sharing with you a simple thrifty craft that has the look of something you would buy at a boutique (don’t you love that?!) It’s a Spring centerpiece – a robin’s egg nest.
I still love the color combination of turquoise blue and chocolate brown, and this is a fun way to highlight those colors together.

I love to thrift store shop and I’ve found some great finds…along with a bunch of things that I brought home that I now question “what the heck was I thinking?” 🙂 Well, today I’m turning that purchase into something better. (thank goodness!)
Here is what you’ll need to make this Spring centerpiece:
wooden easter eggs: $2.00 – (the questionable thrift store find) turquoise ribbon: $2.00 DecoArt paint (2 – 2oz. bottles): $2.50 (Joann’s or Michaels craft stores) spanish moss: $2.50 grapevine wreath: $2.00 – thrift store apothecary jar: $12.00 (thrifted) – you could use big mason jars here too
Total cost – 11.00 plus glass jars (mason jars or apothecary jars)
Step 1: Take apart an old grapevine wreath. I have found that a soak in warm water in your sink can help loosen up the shape of the wreath. You only need a few thin branches from the wreath, but it helps to take it apart a bit to get what you need from it.
Step 2: Clean up those wooden easter eggs from the thrift store. These little eggs were meant to hang from one of those little easter trees, so they all had little strings hanging from the bottoms. I first chipped off the hot glue and pulled out those strings before I began painting.
Step 3: Paint the eggs. The first coat of craft paint I used here is Spa Blue by DecoArt. To hold the eggs up while they dry, I used toothpicks and floral foam.
Step 4: Speckle the eggs. With Dark Chocolate by DecoArt, I flicked bits of paint onto the blue eggs giving them that speckled look. You might want to do this step outside. It’s a bit messy.
Step 5: Clear gloss coat. This step is not shown here, but find a clear glossy top coat to give the eggs a shine.
Step 6: Tie a matching turquoise ribbon around the glass container. Finish off the edges of the cut ribbon by melting the edges with a candle. This is one of my favorite quick tips.
Step 7: Assemble everything together. Layer in pieces of the grapevine wreath, spanish moss and then the blue eggs.
Voila! There you have a fun Spring-y center piece. Inexpensive too!
Thanks for having me today, Cheryl!
Tidymom is a participant in the amazon services llc associates program, an affiliate advertising program designed to provide a means for sites to earn advertising fees by advertising and linking to Amazon.com.
Please respect my work, recipes and photographs. If you do use a recipe in your own writing, please give proper credit and link back to the original post.


That is the perfect spring centerpiece! So cute!
What a darling idea! And so good to see Kami here! 🙂
Love how Kami speckled the eggs and didn’t just leave the solid blue. Cute and yes, very thrifty Spring decoration. Thanks for introducing Kami to me!
Im so ready for spring to come back around for me to try this great idea!
So cute Kami! I love the colors you used. Perfect spring project!
Love this, Kami!
Is it time to get the Easter stuff out? 🙂
Thanks for another great guest post today, Cheryl 🙂
I love it!!
I love that centerpiece! So adorable. 🙂
Very cute! I love blue and brown. And I NEED an apothecary jar like that!
Thanks for the great idea!
SO cute Kami! I’m going to have to make these for a centerpiece. They’re so pretty and Springy.
This idea is so pretty Kami and would match my bedroom perfectly. Thanks so much for sharing!
That cute little Kami is going to be my roommate in a few weeks at a conference. Lucky me!! What a great project. I love it…and love the speckled eggs.
ADORABLE!!! I love it. And Kami is just darling. How fun to see her on one of my other favorite blogs!!!
xoxoxox
Jen
Beautiful, I love those colors together too!
I so, so, so LOVE this!! I am decorating for my MIL’s birthday party, and using a bird theme (one of her favorites). I can’t wait to make a matching version for the party…thanks so much for the idea!!!
Soooo cute!!
So cute for an Easter table! Kami is too creative!
So cute!
Thank you so much for having me today, Cheryl! That was fun!
What a fun idea 🙂
That is extremely cute!
This is so so pretty! I’m on a speckled cookie kick myself. Made me want to.go.to hobby lobby today! I’m definitely making a.version.of.this!!!
What a fabulous project! I want to try it now!!!! =)
this is a great project and I love that you covered frumpy looking eggs and made them fabulous! Thank you for sharing:)
OMG! I saw something very similar at Cracker Barrel over the weekend and was going to re-create it next week!
This is a great idea! Just perfect for spring!
-Lani
Thats really cute!
i cant wait for spring to come again so i can decorate with this awesome idea!