Monogram Stenciled Canvas Bag
This post may contain Amazon or other affiliate links. As an Amazon associate, I earn from qualifying purchases.
Today I thought I’d share the easy details on how I made this adorable monogram stenciled canvas bag using a paper doily.
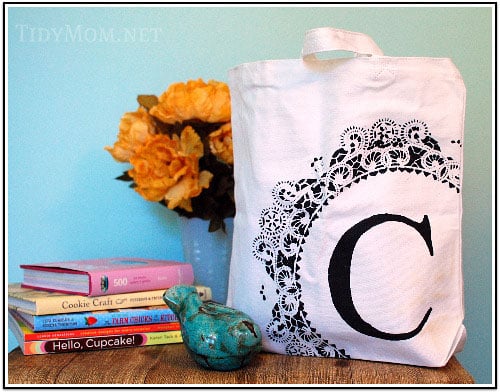
I originally saw this fabulous bag over on ashleyannphotography before I got my Silhouette machine. I quickly bookmarked her fabulous tutorial and picked up my supplies.
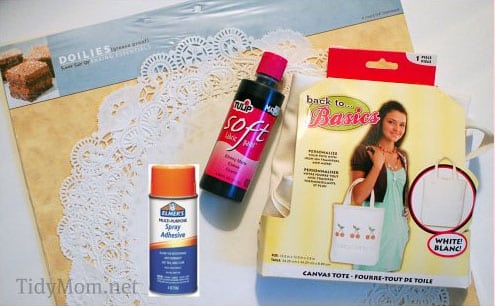
How to Make Monogram Stenciled Canvas Bag
Supplies:
Canvas tote bag (I chose white, but you could use the natural as well)
Soft Fabric Paint (I used black, but again, you could use any color)
Large Paper Doily (I used the 12″ size)
Adhesive Spray
sponge brush for paint (not pictured)
Directions:
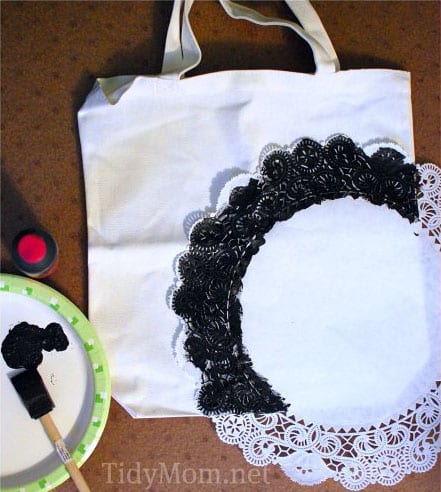
- Spray one side of doily with spray adhesive (trust me, you don’t want to skip this step) then place doily on one corner of bag
- Use fabric paint to paint over holes in doily
- Carefully remove doily before paint dries
- Monogram
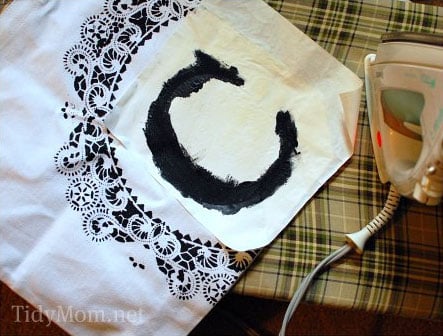
There are a few different way’s you can monogram your bag
- I used my Silhouette and Freezer paper to cut a “C” stencil, ironed the freezer paper stencil onto the bag, and painted.
- you can draw/trace a letter on, and paint by hand, like Ashley did
- Don’t have a die cut machine? to nervous to paint by hand?…..instructions for making a stencil with freezer paper here.
So there you go~
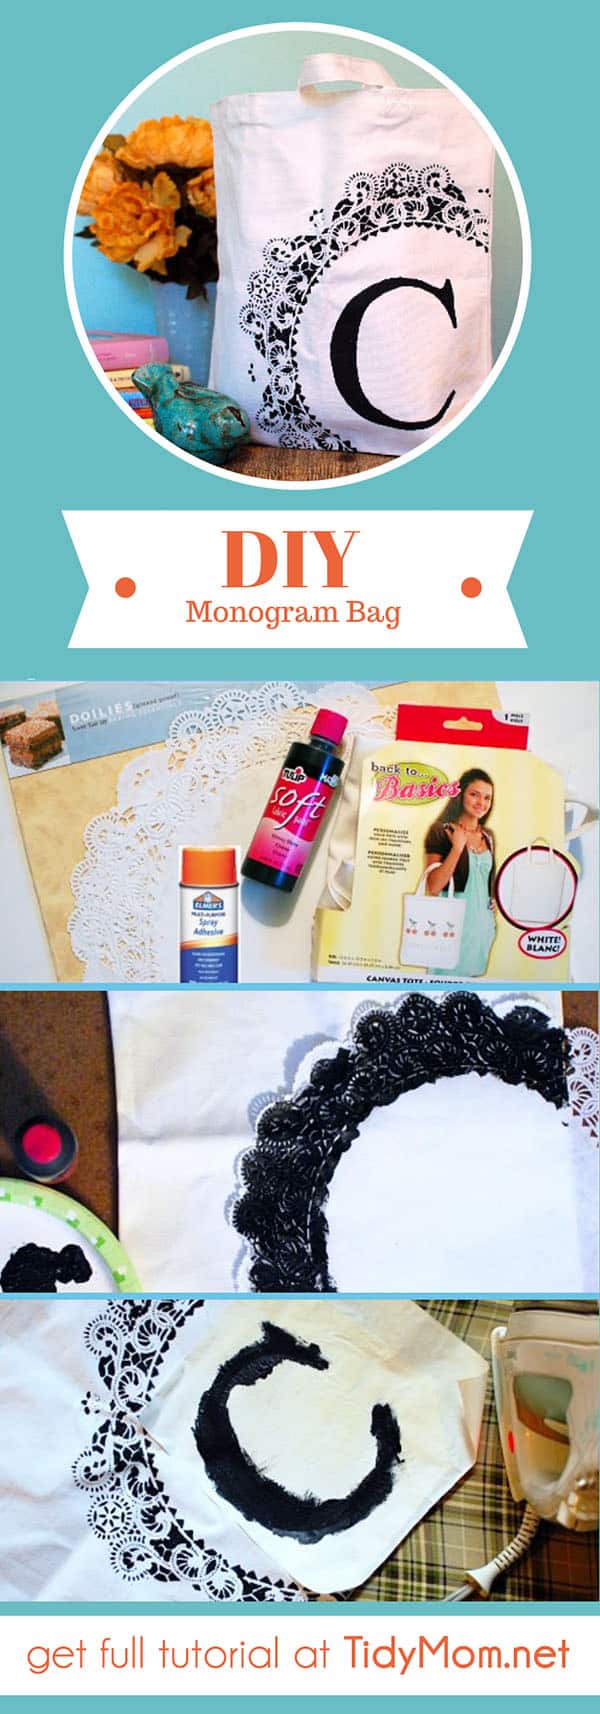
Super easy and Super cute huh?! Again, I want to thank Ashley for this wonderful idea…..just think of what all you can do with these cute bags!
With the holidays quickly approaching, you can easily make these up ahead of time, and while your out shopping, pick up goodies to fill them, for neighbors, teachers, bus drivers, brides maids, girl friends……the possibilities are limitless!
Craving more? Sign up for the TidyMom newsletter to stay on top of what’s new right to your inbox! And stay in touch on Facebook, Twitter, Google+ and Pinterest for all of the latest updates

Tidymom is a participant in the amazon services llc associates program, an affiliate advertising program designed to provide a means for sites to earn advertising fees by advertising and linking to Amazon.com.
Please respect my work, recipes and photographs. If you do use a recipe in your own writing, please give proper credit and link back to the original post.



I love it ! You did a wonderful job !
How neat to have all those pieces that your dad made. :-)Have a great weekend !
Janae
I totally agree with my SIL I love it. I am sad that when I moved from Australia I had to leave behind a lot of family heirloom furniture pieces, maybe if we move back one day I can reclaim them.
It is so special to have those pieces.
That looks fantastic! Love the bed too, beautiful :o)
How fortunate it is to have some keepsake pieces lovingly made by your dad…Man..was he good at woodcrafts or what!! You follow in his steps i think…the night stand turned out so much like the finish on the bed..great job!
Cheryl, what a sweet post! Your dad was very talented! What a beautiful lingerie chest, and how special that you have so many pieces of furniture made by him. Yes, I think he would be/is very proud of you with your nightstand transformation – it looks like it’s a matching set! And thanks for visiting my Christmas card repurposing post. I’m glad you enjoyed it!…Donna
Love it! You did a great job and he would definitely be proud. I love the lingerie chest he made you also.
your daughter’s room looks fabulous!
Emily@remodelingthislife
Look at you, your first piece of painted furniture and you’re already a pro at it!!!!
It looks beautiful!
Cheryl,
I LOVE THAT!! and the lingerie chest is just wonderful. I liked how your dad did the stained base with the painted chest…..Sunshine will be proud of her new pc. of furniture and it holds memories for her now of “you and her”. You guys did a fantastic job!
Pammie
I’ve TAGGED you Cheryl!! Come over and pick it up to pass on.
Fabulous!
Cheryl that is awesome!!! It looks like it matches perfect and the price makes it even better! I wish I was as talented. 🙂
You girls did an awesome job of overhauling that little nightstand… it is perfect now, just perfection.
Great job! I tried that once… didn’t turn out near as nice! ha.
That really turned out beautiful and the dresser your dad made is beautiful too! Your dad would love what you did with the nightstand!!
It looks great!
Thanks for joining the party. 🙂 You know I love this…
Hi there..so glad I came across your blog from Sarahs! Great redo…I love a before and after. Love the piece your Father built..very special. cherry
Love both pieces! They have just the kind of distressed look I like!
It turned out really good!
Manuela
Great makeover! How lucky you are to have all that great furniture made with love by your dad! Keepsakes for sure and heirlooms for the kids.
From trash to family treasure! That is a special chest now!
Wow! Wow! Wow!!!! That lingerie cabinet is GORGEOUS!!!
I love that piece your Dad made for you – how special and cherished it is. Your make-over of the little side table is great!
Blessings,
Marie
http://emmacallsmemama.com
Great job! I’m sure he would be proud.
What a beautiful piece that your Dad made. My great grandfather also built furniture.
Great job on the nightstand redo. It looks perfect!
Very cute bag! I think they may be on my Christmas gift giving list!
That’s super cute. LOVE it!! I’m gonna link up to it this week at DSC. Thanks for sharing, friend!
I love that bag – it turned out so cute! Glad I stopped by! That will make the perfect teacher gift! Thanks!
Awesome monogram!!! I linked to your tutorial over at Craft Gossip Sewing:
http://sewing.craftgossip.com/tutorial-no-sew-monogram-using-spraypaint-and-a-doily/2010/08/23/
–Anne
awwwe, Thanks so much Anne!
Absolutely beautiful. So effective!
What a great idea! I definitely want to try this.
This might be a silly question, but does the doily really come off easily after having been adhered with the adhesive spray?
yes, the adhesive spray does not make it stick super good to the
canvas……..so yes it comes off very easy
My cousin recommended this blog and she was totally right keep up the fantastic work!
Pingback: Priceless Writers
Pingback: Tidymom
LOVE this! Turned out way cute, thanks for the tute! So glad you to have found your blog, really sweet.
We’d love if you came and linked your project up to our fabric linky party today!
Pingback: Factory Direct Craft
How large did you make your letter stencils?
And this project is fantastic~thanks so much!
Pingback: Jill Cameron
Pingback: Jill Cameron
Hey, this is a great idea! I loved!
Link you at my page, but it is in portuguese…
So, just for you know, your page is awso!
Sorry for my bad english, xoxo Tate
Pingback: polkadotmarket
Thanks for sharing this, now my daughter has a gift for her Auntie this Christmas.
This is such a wonderful Christmas present idea! I found you via Sew Mama Sew. Thanks for the great tutorial!
What a fabulous & unique idea! I included this in my “Non-sewing Handmade Gift Ideas” list: http://www.amytriedit.com/2010/11/non-sewing-handmade-gift-ideas.html.
Very cute. I’ve had that project bookmarked forever. Hopefully this will be the year I actually get to it.
Pingback: ilovetocreate
Pingback: Kathy Cano-Murillo
Pingback: ilovetocreate
Just made 2 of the totes! One for my mom and one for my daughter. I used my Cricut to cut cardstock paper for the letter stencil and adhesive spray instead of freezer paper (since I didnt have any) and it WORKED! Thanks so much for the tutorial. Now I have really cute personalized valentines gifts.
I posted a link to this on my blog. I just love this idea. Thanks!