DIY {felt} Poinsettia Pin
This post may contain Amazon or other affiliate links. As an Amazon associate, I earn from qualifying purchases.
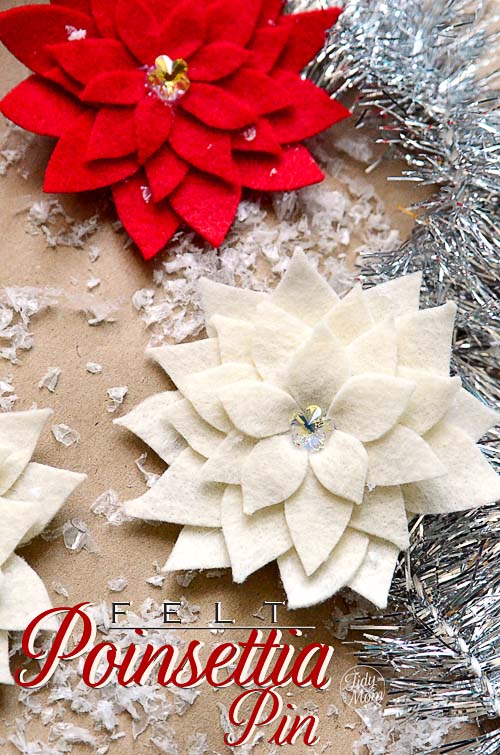
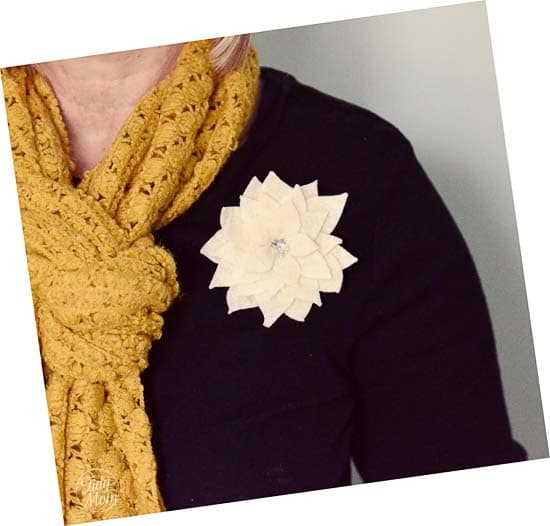
These Poinsettia Pins are as fun to wear as they are to make.
I have to admit, I’ve been slacking in the kitchen a bit this holiday season. But I did put on my elf hat and have come up with another simple craft. Recently I shared the waterless snow globes, and this week I’m excited to share these adorable Felt Poinsettia Pins I made!
They are very easy to make and don’t take much time. I made pins to wear on a sweater, but they would also be cute pinned on to a stocking or pillow, used as a gift topper, fridge magnet, or even a tree ornament.
You can make them any size using felt yardage, or simply using the felt sheets you can get at the craft stores, like I did.
*Please note that ALL of my measurement are approximate, there’s no need to be very specific, and you can make them any size you wish.
How to make a Felt Poinsettia Pin
What you need
(have linked most of these items to Amazon, but they can all be purchased at any craft store like Michaels or Hobby Lobby
- Red or Cream Felt
- Scissors
- Glue gun and glue sticks
- 1 inch bar pins
- Acrylic Gems (or any object you’d like to put in the center)
- tape measure or ruler (not shown)
- lid or glass to trace 2-1/2 ” to 3″ circles (not shown)
Steps
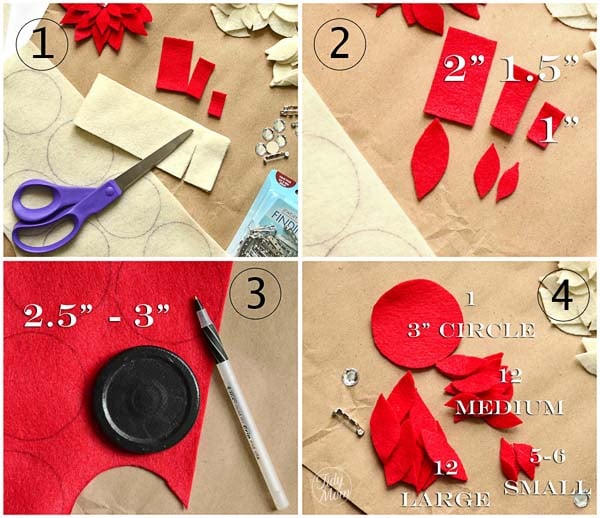
1. Fold sheet of felt in half lengthwise, and cut two strips 2′ wide, two strips 1.5″ wide and one strip 1″ wide.
2. Keeping the felt strips folded in half (so you are cutting 2 at a time), you will cut rectangles for the leaves. I just eyeballed this; I cut the
- 2″ strips into twelve 1′ wide rectangles (so they are now 2″x 1″)= 12 large
- the 1.5″ strip into twelve 3/4″ wide rectangles (1½” x ¾” )= 12 medium,
- the 1″ strips into six ½” rectangles (1″ x ½”) = 6 small
I then basically cut the corners off each rectangle, to make a leaf shape.
3. I used a lid that’s was almost 3″ in diameter to trace and then cut a circle.
4. You now should have; 1- 3″ circle, 12 – 2″ large leaves, 12 – 1½” medium leaves and 6 – 1″ small leaves
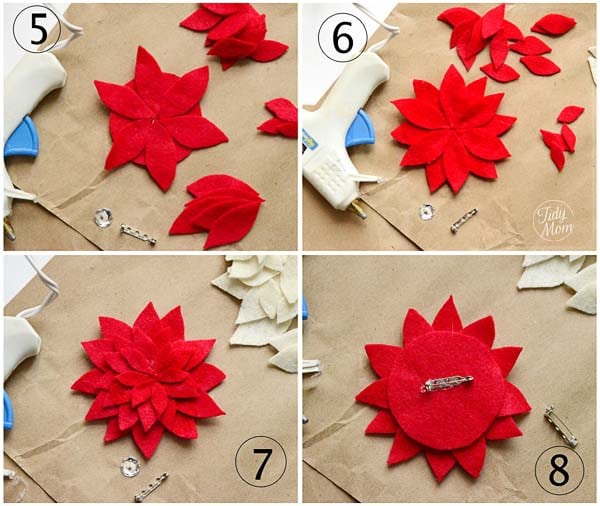
5. Using the hot glue gun, glue 6 large leaves on to the circle. (be careful not to burn yourself with the hot glue)
6. Hot glue the remaining 6 large leaves on top of the first 6 leaves, spacing between the original six.
7. Repeat the process with the medium and small leaves, until you reach the center and use up all of your leaves (depending on what size I cut my leaves sometimes I was able to use 6 small leaves, and sometimes I only got 5 small leaves to fit)
8. Flip your pin over and glue the one inch bar pin to the center of the circle.
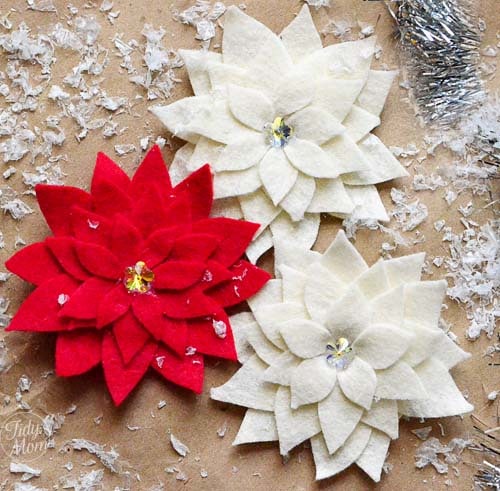
Glue your gem or embellishment to the center and your done!!
So cute on my shirt!!
You may also enjoy my Felt Rosette Flower Pin Tutorial
How is your holiday to-do list coming along? Is your shopping done? baking? crafting? parties to attend?
I’m doing real well other than my baking…………..I better go get in the kitchen now!!
I'm linking up with these parties.......please visit them!Made by You Monday, Get Your Craft on , Weekend Wrap Up Party, Pity Party
Tidymom is a participant in the amazon services llc associates program, an affiliate advertising program designed to provide a means for sites to earn advertising fees by advertising and linking to Amazon.com.
Please respect my work, recipes and photographs. If you do use a recipe in your own writing, please give proper credit and link back to the original post.





I really want to make this!! Its so simple yet elegant and beautiful. Thank you SO much for the tutorial… I am not the crafitest person and its really laid out so well, I think I might be able to do it!!
I had to pin it cause its so beautiful!
These are so pretty Cheryl. A perfect gift idea and so many different uses for them. Great tutorial too!
wow…these are so pretty & versatile . love the red color !
These are beautiful! I love the cream ones especially. Can’t wait to try it out!
These are SEW cute!
My sister in law made something similar last year – put clips on the back and they were tree ornaments – put felt loops on the back and they were napkin holders – made all different sizes and put them in a garland that went up her bannister, She also used the felt that has the glitter on it. I did not think of making any small enough to wear on my clothing – thanks for such a nice idea.
They’re beautiful. My grandma would love one of these to wear on her jacket. Might have to find some felt while I’m out and about today.
I’m going to have to try these. Lovely!
These are gorgeous, Cheryl! Fabulous tutorial, too. Pinning and Stumbling!
I love this idea! They are beautiful pins. Thanks 🙂
These are adorable. They’d be a cute gift to make for a teacher!
Thank you for sharing this tutorial. I was just playing with felt last night and trying to figure out how to make something like this on my own. Then this tutorial arrives! It must be fate.
These are so beautiful and festive. You are truly talented and creative. 🙂
This is beautiful! Cannot wait to try…of course, I am going to stick it on gifts, but no matter, it’s BEAUTIFUL!!!
LOVE this pin! So easy to make, and so pretty! Merry Christmas!!
What a fun holiday craft, very elegant!
super cute and creative!
How fun it would be to pin that right in the middle of a very simple purse. It would be such a subtle (but not so subtle) holiday look with that poinsettia flower getting wonderful attention!
Lovely! My daughter would love to make a bunch (or bouquet) of these for her friends.
So pretty and festive!!
These are adorable! They would be great on just about everything!
These are so pretty!! I am going to have to make these with the kiddos this week for neighbor gifts! 🙂
These are absolutely adorable! Great tutorial, Cheryl!
This is so beautiful. Your talent always shines missy!
Gorgeous, Cheryl!!!
These are absolutely gorgeous!
Cute! I needed something to make my Christmas outfit more festive and this will be PERFECT! I’m thinking of making mine a barrette or attach it to a headband.
Oh these are So VERY VERY pretty and festive… I would love for you to share them
I highlighted these beautiful flowers on my little blog at http://wadelmat.blogspot.com/ They are so very pretty!
These pins are so pretty. I hope to have some time to make these.
Thanks for the tutorial.
Ruth
I have been wanting to try my hand at felt pins. Yours are beautiful, Cheryl – what great pieces to add a little somethin’-somethin’ to the holiday wardrobe.
This is just absolutely lovely! I need to make one of these.
How cute! I actually made something very similar to these as gifts for friends this year and they were a huge hit!
These are so beautiful. Thanks so much for sharing this wonderful tutorial. Megan
i made these for teachers gifts and they were a huge hit ! thank you very much !
I know I’m late to the party, but this “how to” is awesome. I’m going to use it to make a hair clip for my little girl. She LOVES wearing flowers in her hair and will go crazy over this! I’ll just make it slightly smaller since she has a small head. :0)
I wanted to thank you for this tutorial. I fell in love with a poinsettia maternity sash on Etsy but knew I could make it cheaper. Thanks to you I saved money and made a beautiful Christmas maternity sash!!
Hi, I just stumbled on to you from Pinterest. I love these. My mom lives in a retirement community and I thought these would be great for her friends that she has made. Gives me another gift to add to my fabric covered Christmas balls. Thanks for sharing this. Gives me an idea to use all the felt I have left from making wall hangings and doll shoes.
Jennifer
I love these and would love to make some for Christmas this year, but am having trouble with getting the template. Is there any other way to get it, beside going through Ask .com ? I tried to get it , clicked on downlaad, but it didn’t do anything.. Am I doing something wrong ? Thanks !!!
I’m a little confused, there is no template to download and I don’t know what you mean about going through Ask.com?
All of the directions are in the post.
I will be using this idea to make fondant flowers for the cake I will be making for a ladies group in our church in December. Thanks for all of you ideas.
these are very neat thanks for sharing
Thank you so much for the tutorial. It has all the details and pictures I needed.
This are beautiful! I can’t wait to try them with my daughter’s in a matching pale blue and green for my gingerbread kitchen! I already pinned them and added them to our Christmas project list.
Thanks for sharing!!!!
I wan t to make the poinsettia pin but do not see a place to download it from.. I really can not write out all your directions/Thank You